2.2. Installation and Execution on Mac OS
2.2.1. Before Installation
If you move the phits folder to a different location or rename it after installation, PHITS will stop working. Please reinstall the software.
The applications previously displayed on the Dock—PHITS.app, ANGEL.app, DCHAIN.app, PHIG3D_launch.app, and PHITSPad.app—have been consolidated into PHITS Router.app.
Ghostscript is required to view EPS files created by PHITS. If Ghostscript is not installed, on machines with internet access and using Homebrew or MacPorts package manager, the PHITS installer will automatically install Ghostscript. On machines without a package manager, the Ghostscript installer included in the PHITSXXX folder will launch, and you can follow the on-screen instructions.
To install PHITS, you need a 7zip-based command such as 7zz or 7z. This will speed up the installation. On machines using Homebrew or MacPorts package manager, the PHITS installer will automatically install 7zip. On machines without a package manager, the PHITS installer will use the tar command included in macOS.
2.2.2. Installation Procedure
2.2.2.1. Recommendation method
Give Terminal.app Full Disk Access permission in System Settings > Privacy & Security . Terminal.app is located in the
Utilitiesfolder inside theApplicationsfolder.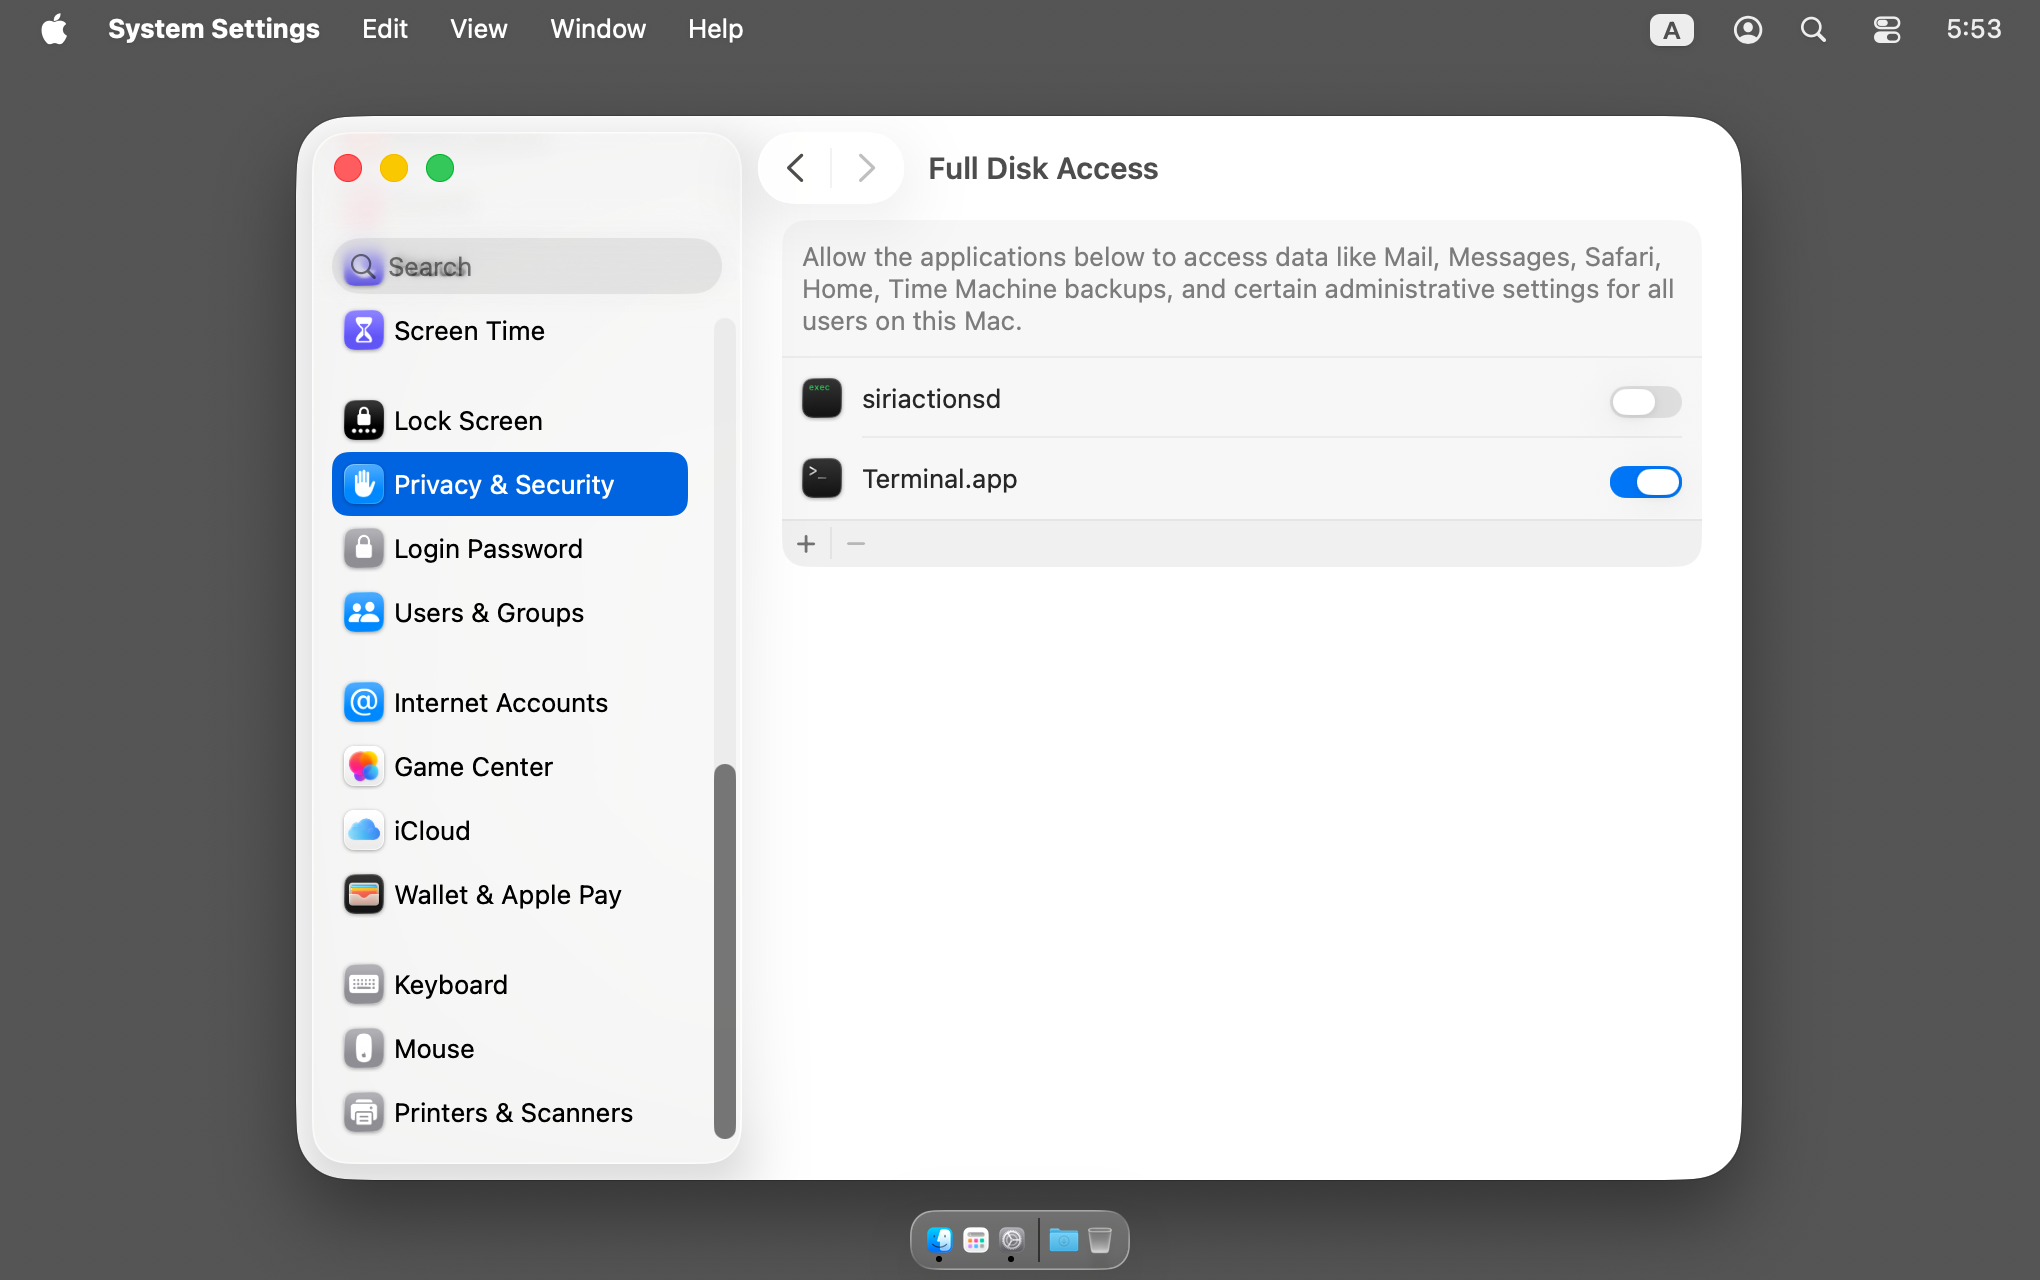
Fig. 2.2.1 Granting full disk access to Terminal.app.
Extract the zip file downloaded from the office, and inside the
PHITSXXXfolder that appears, go to themacfolder. Right-click (or secondary click, two-finger tap on a trackpad, or control click; hereafter referred to as right-click) on PHITS_Installer.command and select “Open” from the shortcut menu.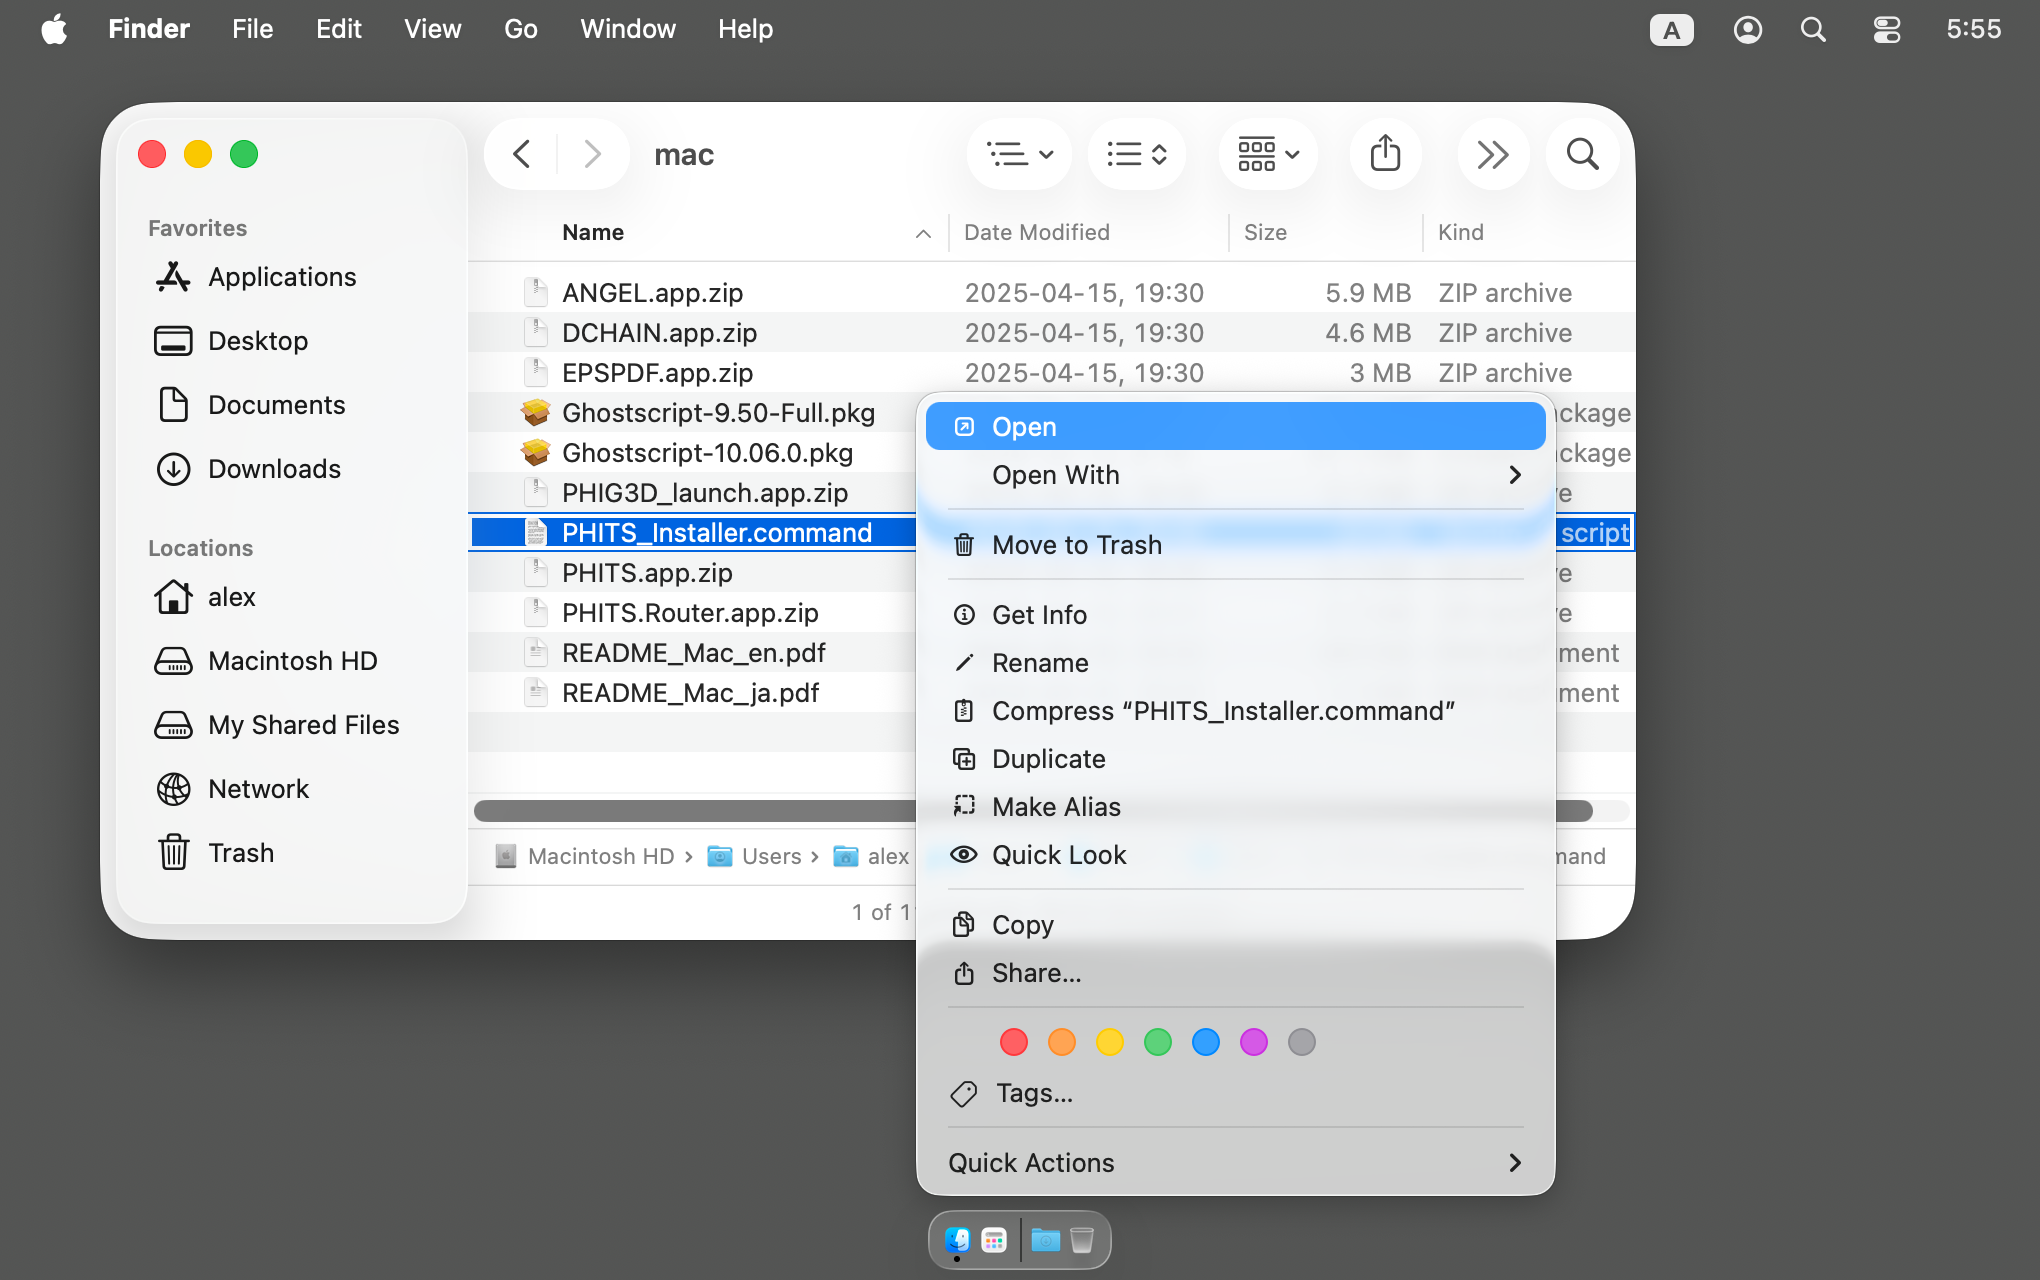
Fig. 2.2.2 Launching PHITS_Installer.command
For macOS 14 Sonoma and earlier, a dialog will appear asking you to confirm whether you want to open this application because it is from an unverified developer; click Open.
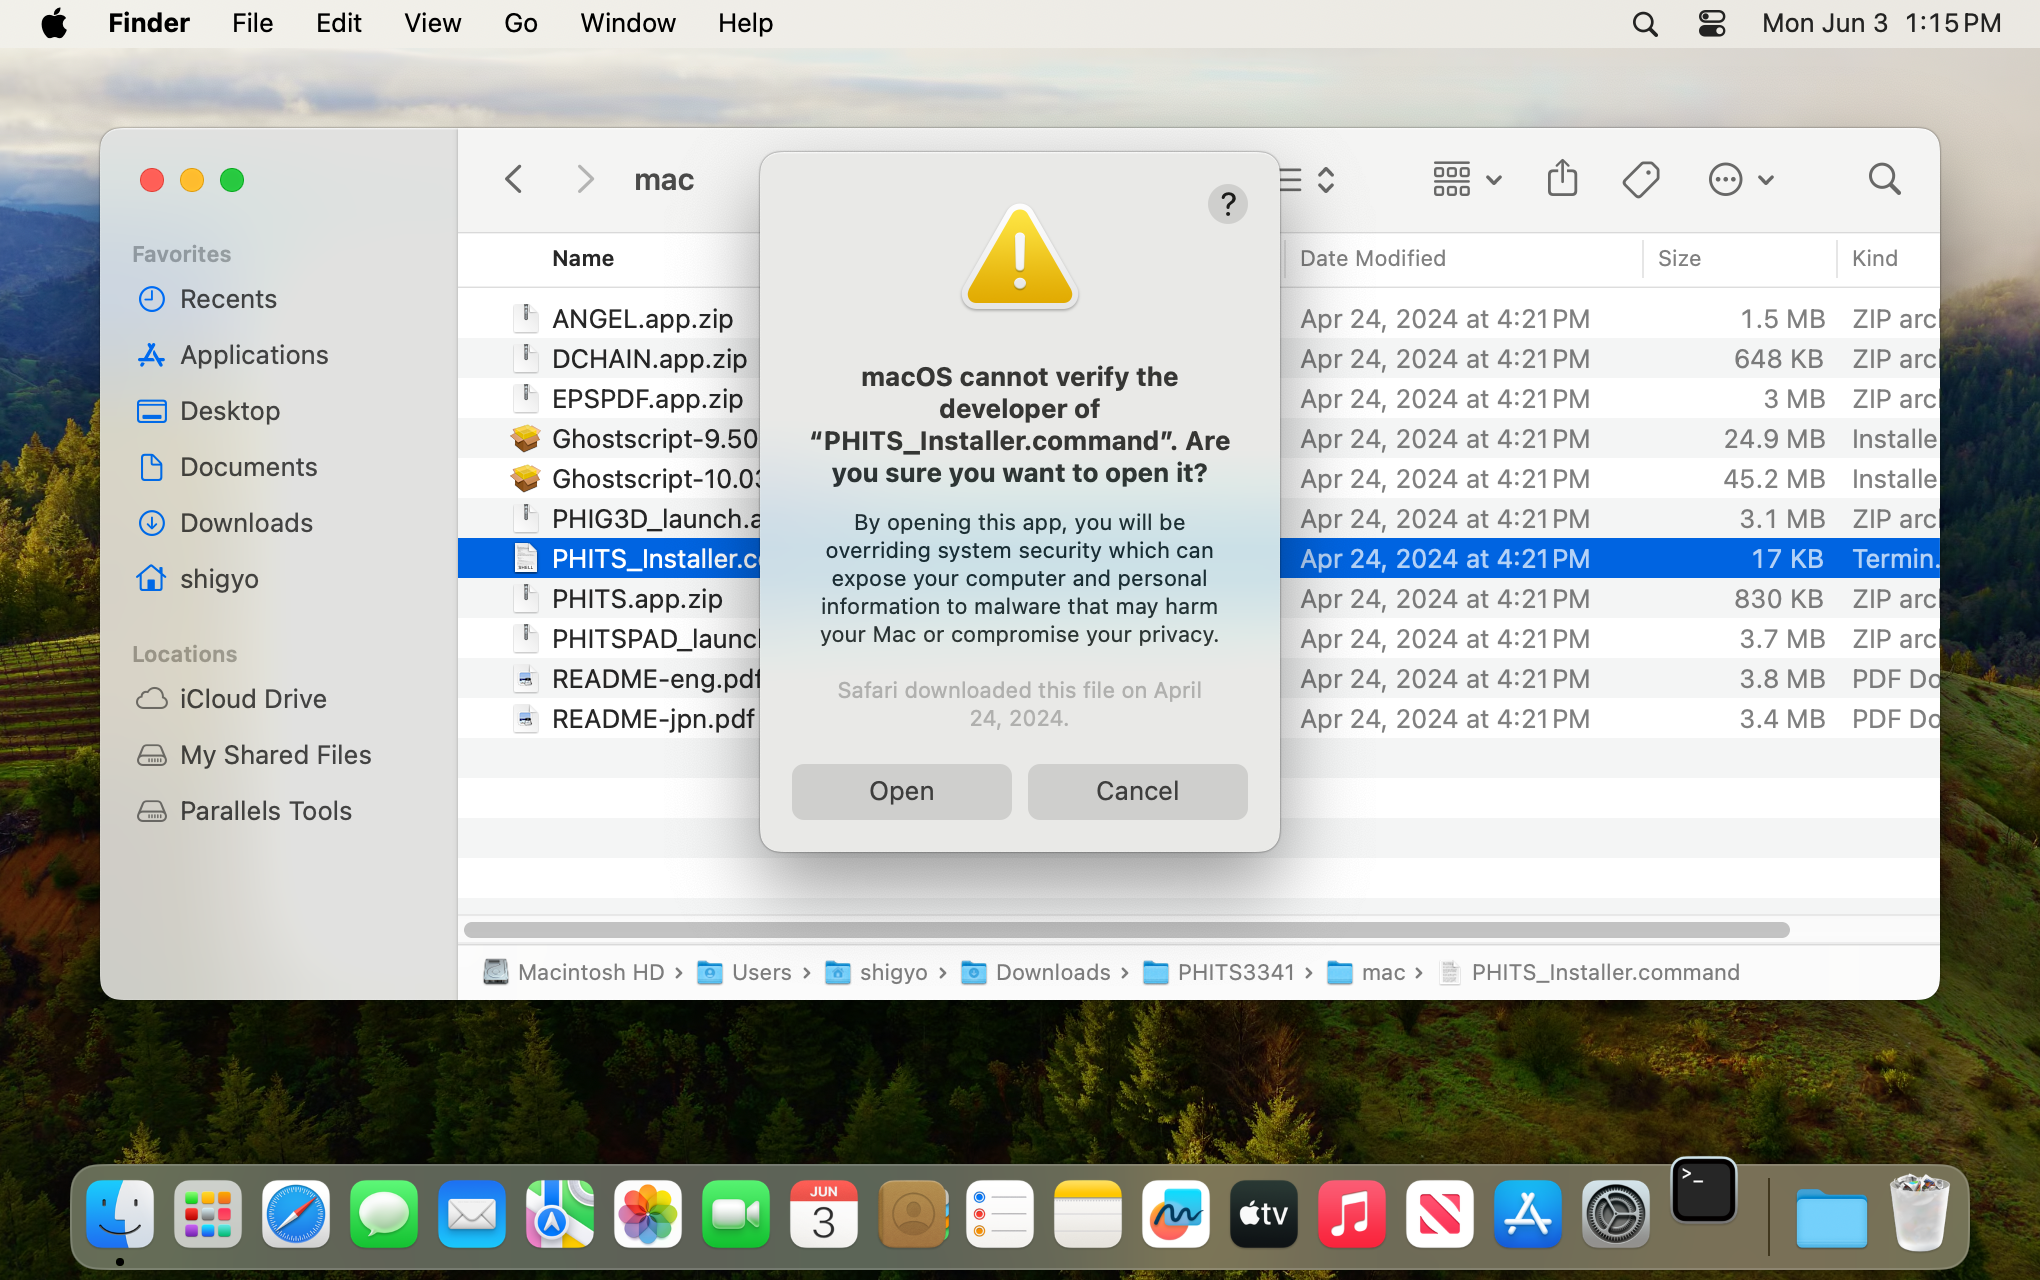
Fig. 2.2.3 A dialog box asking for confirmation whether to open because the developer has not verified it.
If you are using macOS 15 Sequoia or later, when you right-click PHITS_Installer.command , a dialog box may appear saying that it is not open. Click Done.
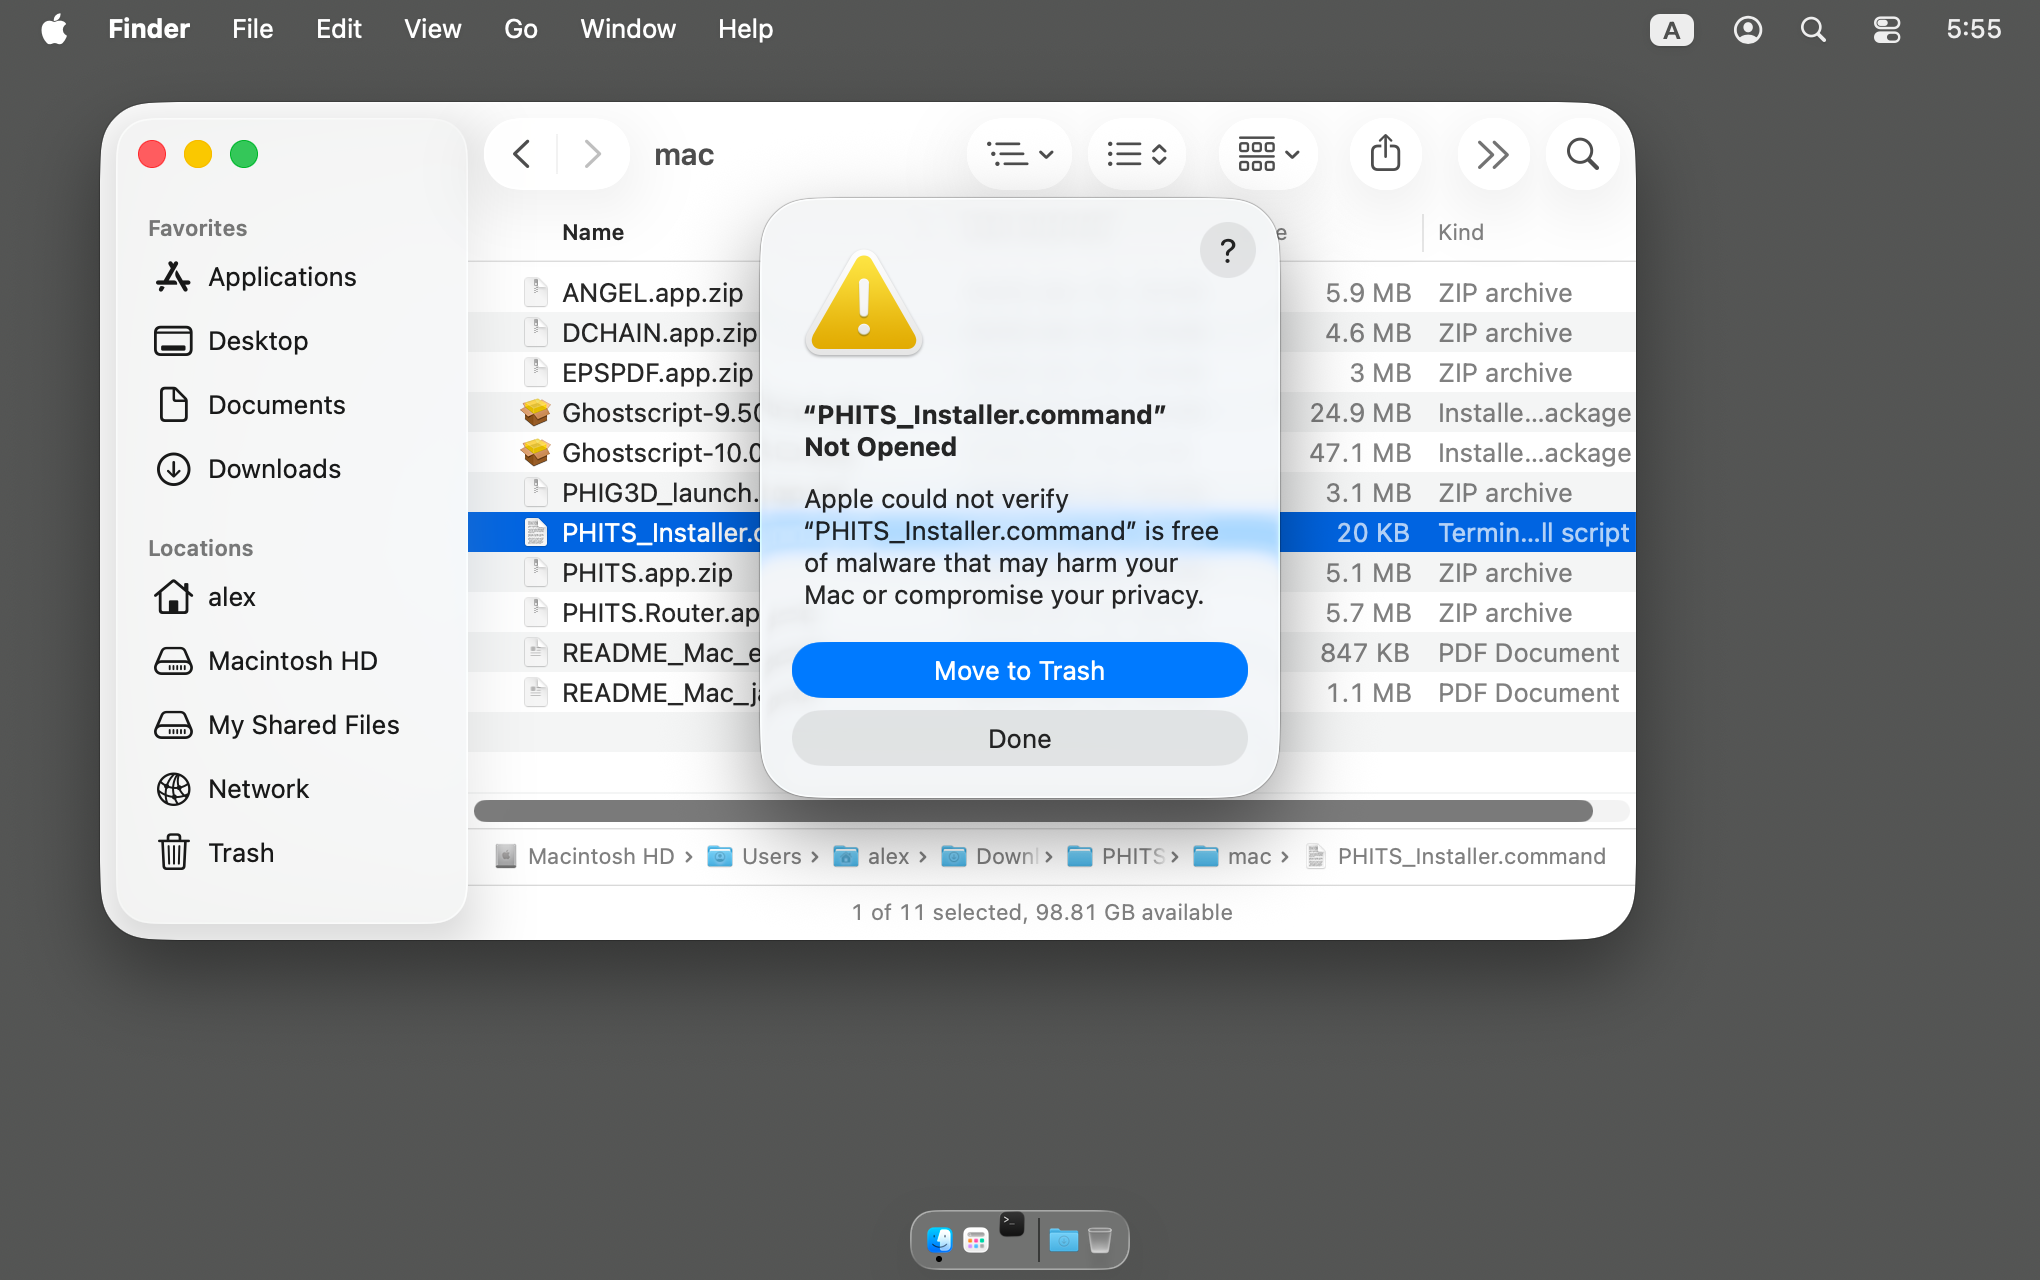
Fig. 2.2.4 A dialog box indicating that PHITS_Installer.command is not opened.
Under Privacy & Security in System Settings, click Open Anyway to the right of PHITS_Installer.command was blocked to protect your Mac.
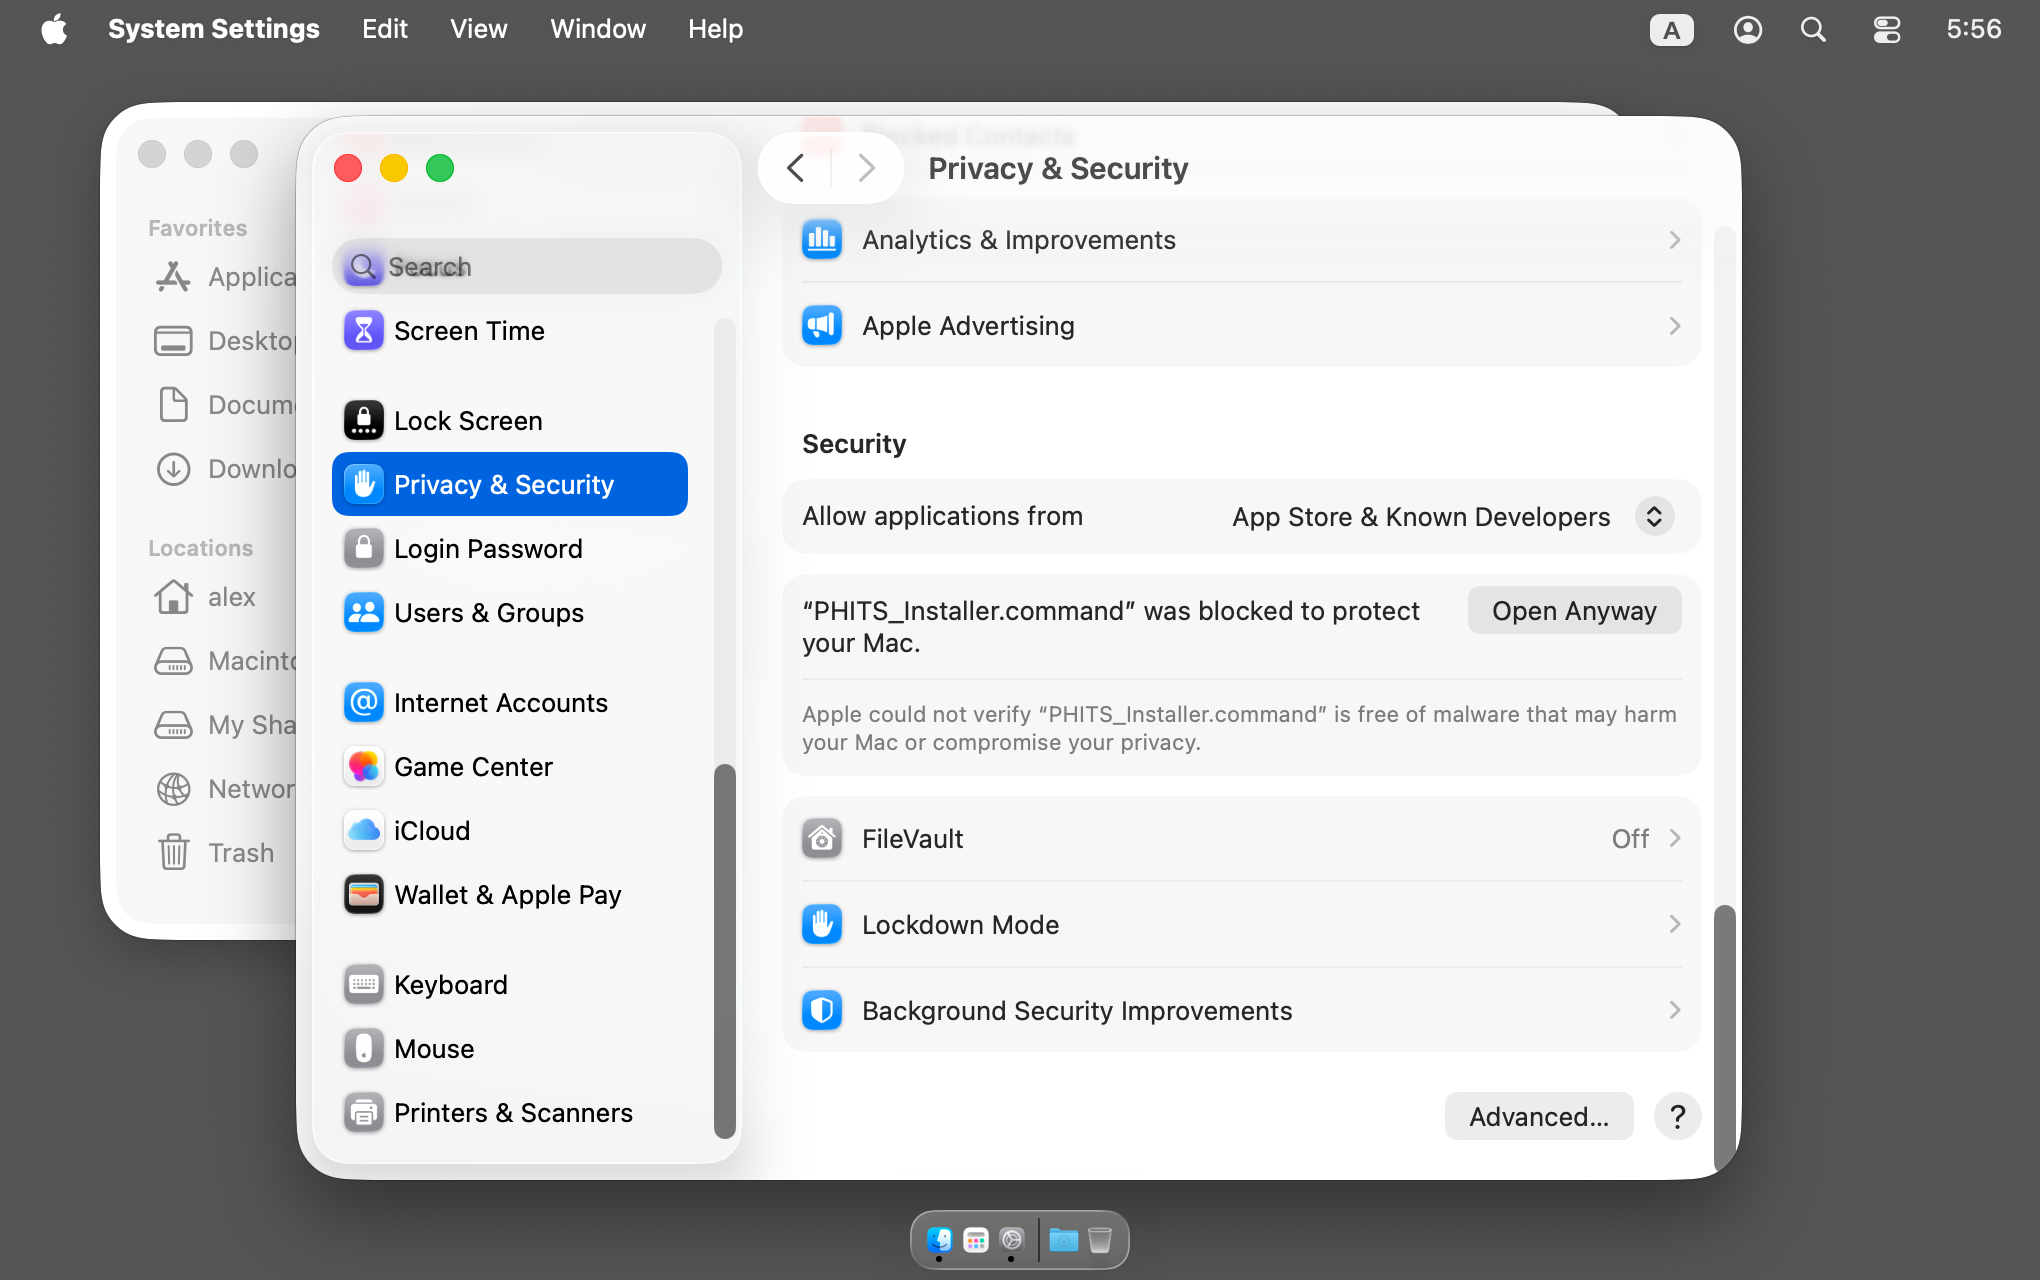
Fig. 2.2.5 A dialog box indicating that PHITS_Installer.command is not opened.
If a dialog box appears prompting you to enter an administrator username and password, follow the instructions.
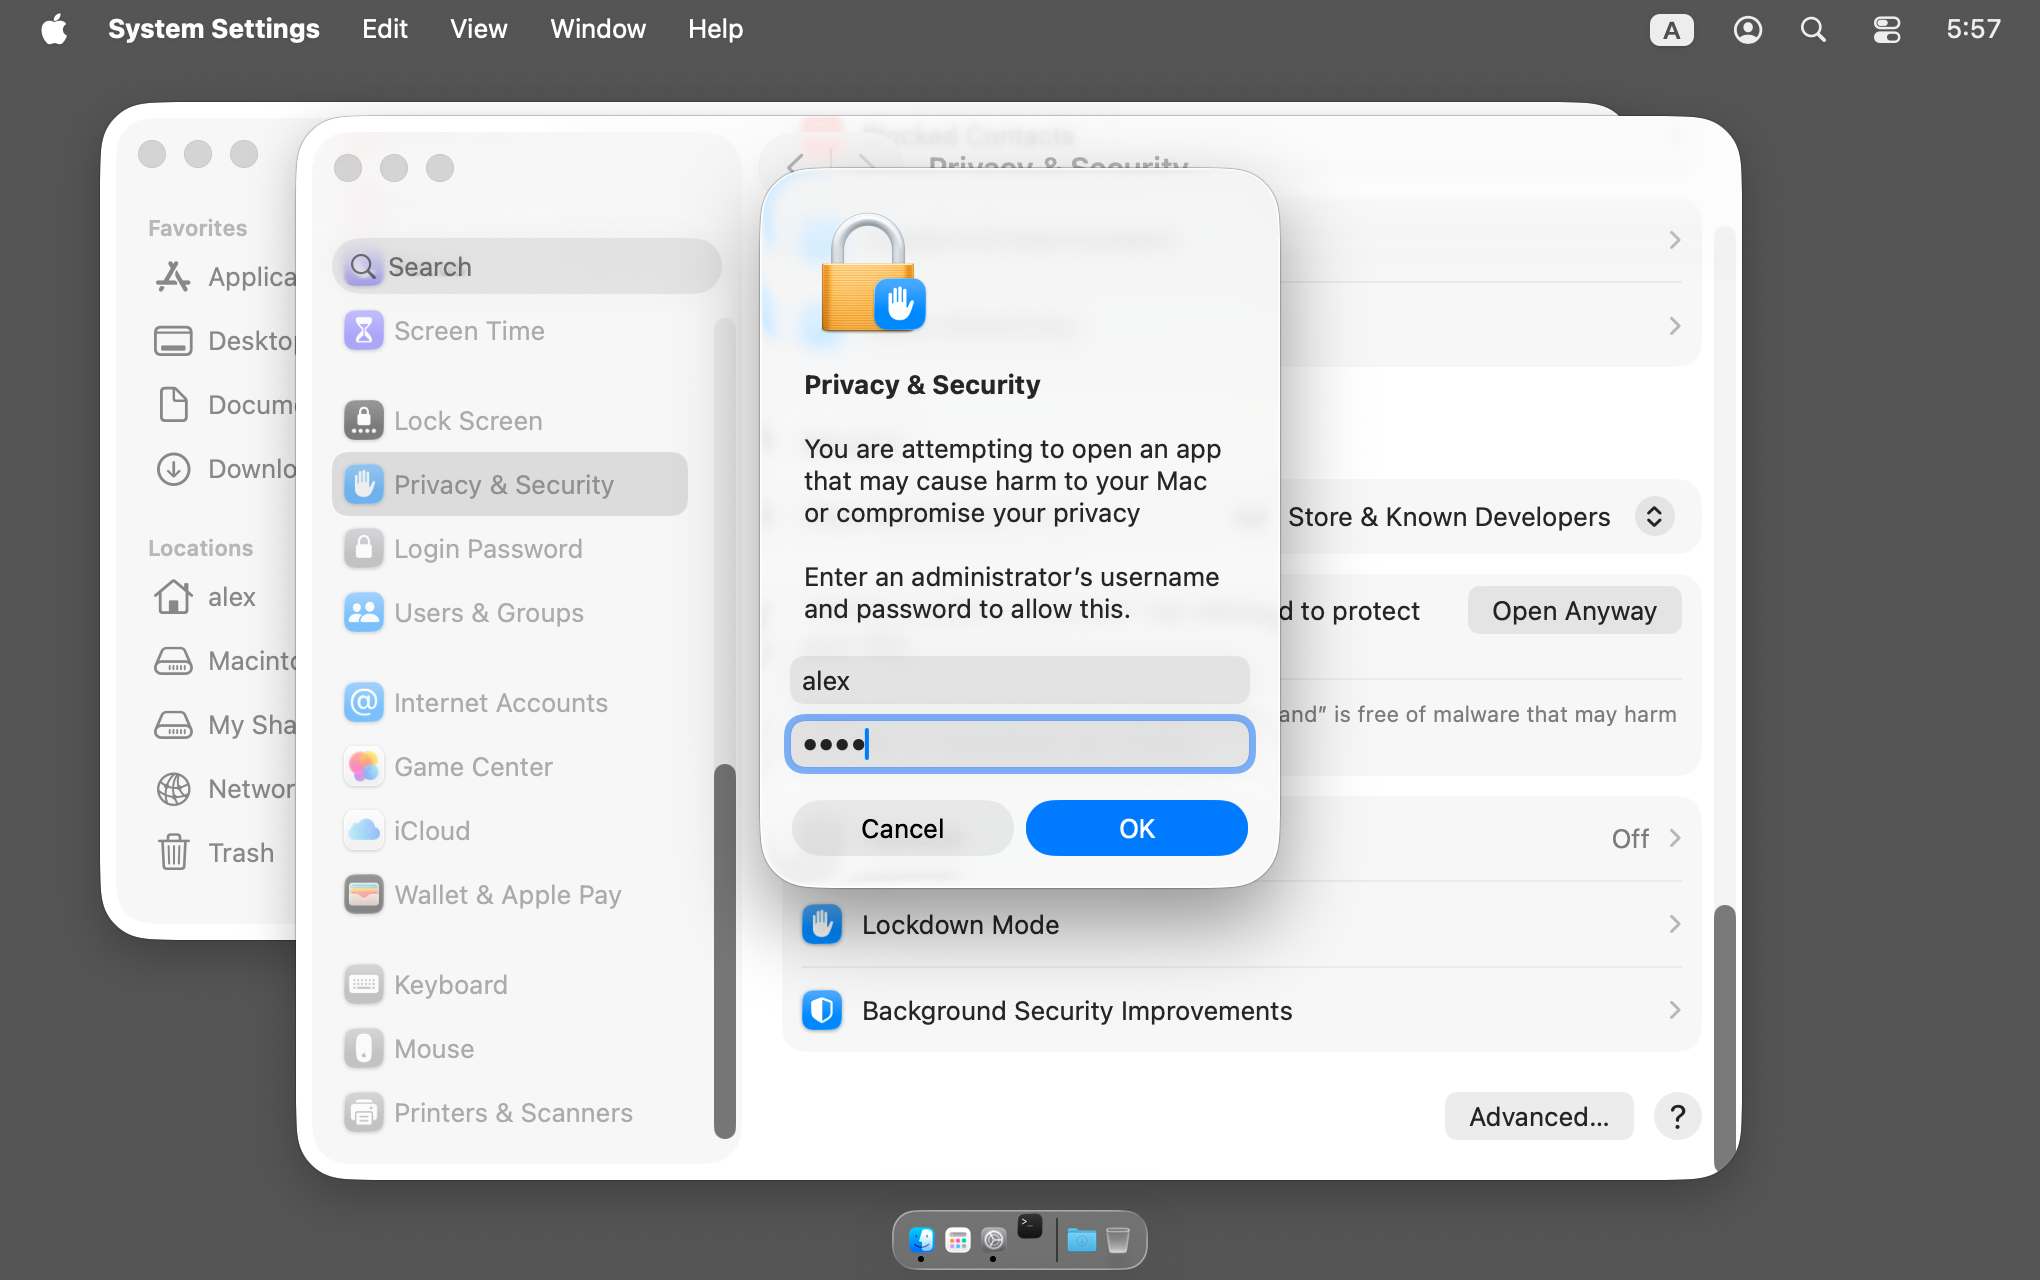
Fig. 2.2.6 A dialog box prompting for the administrator username and password.
If you cannot start PHITS_Installer.command, open a terminal, navigate to the directory where PHITS_Installer.command is located, and execute the following command. Then, right-click PHITS_Installer.command and select Open from the shortcut menu.
$ chmod 755 PHITS_Installer.command
If Ghostscript is not installed and a package manager is not available, the Ghostscript installation window will be displayed. Follow the instructions on the screen. If Ghostscript is installed or a package manager is available, this screen will not be displayed.
When selecting the installation mode, select Automatic . Select Manual if Automatic does not work properly.
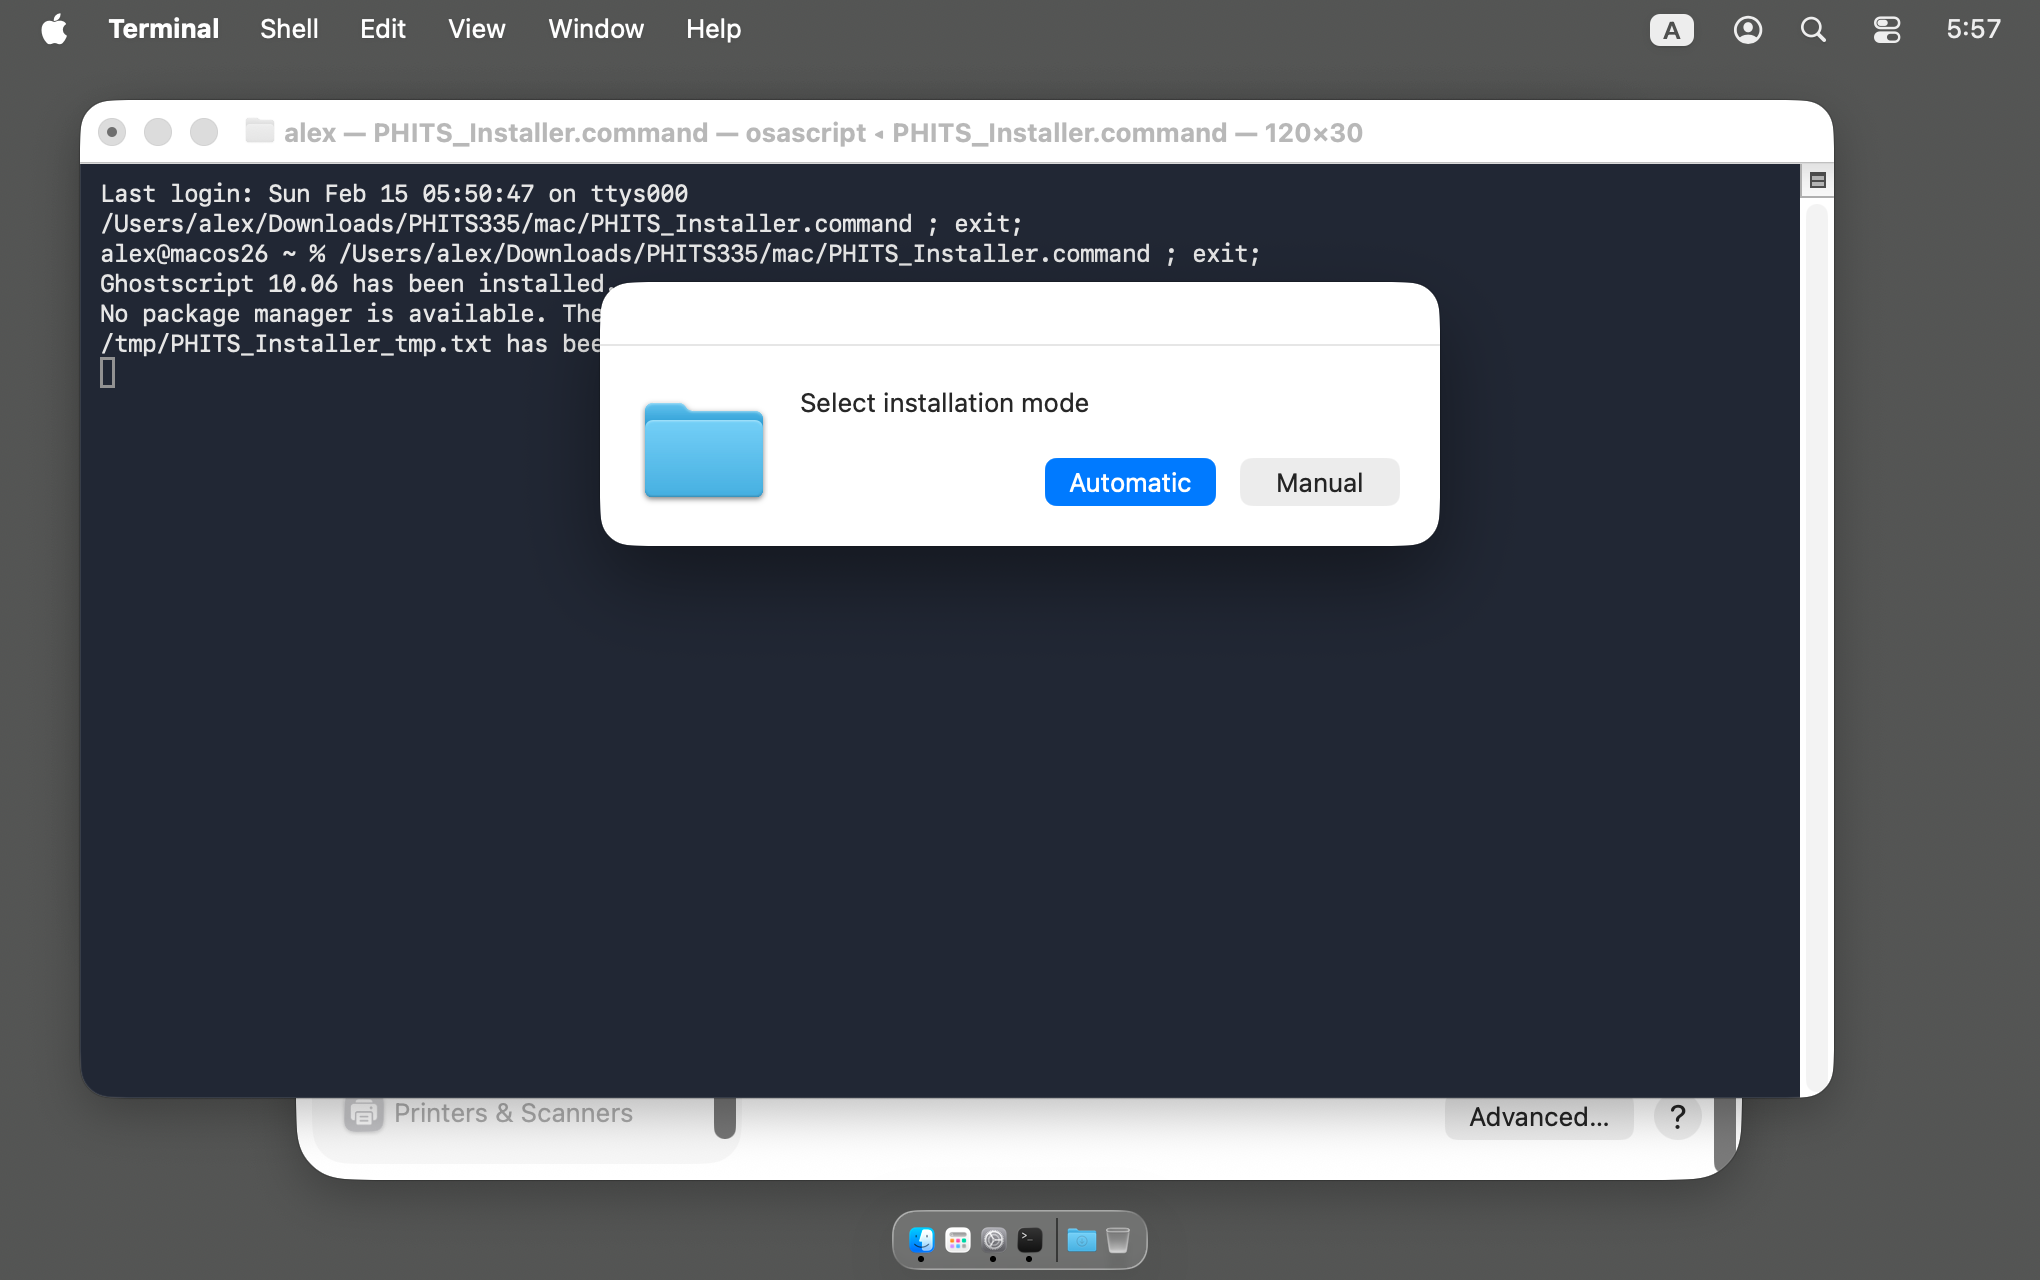
Fig. 2.2.7 Selecting an installation mode
Specify the destination folder for installation. Usually, the folder with the same name as your account name ( alex in the screenshot below) is selected, so press Select.
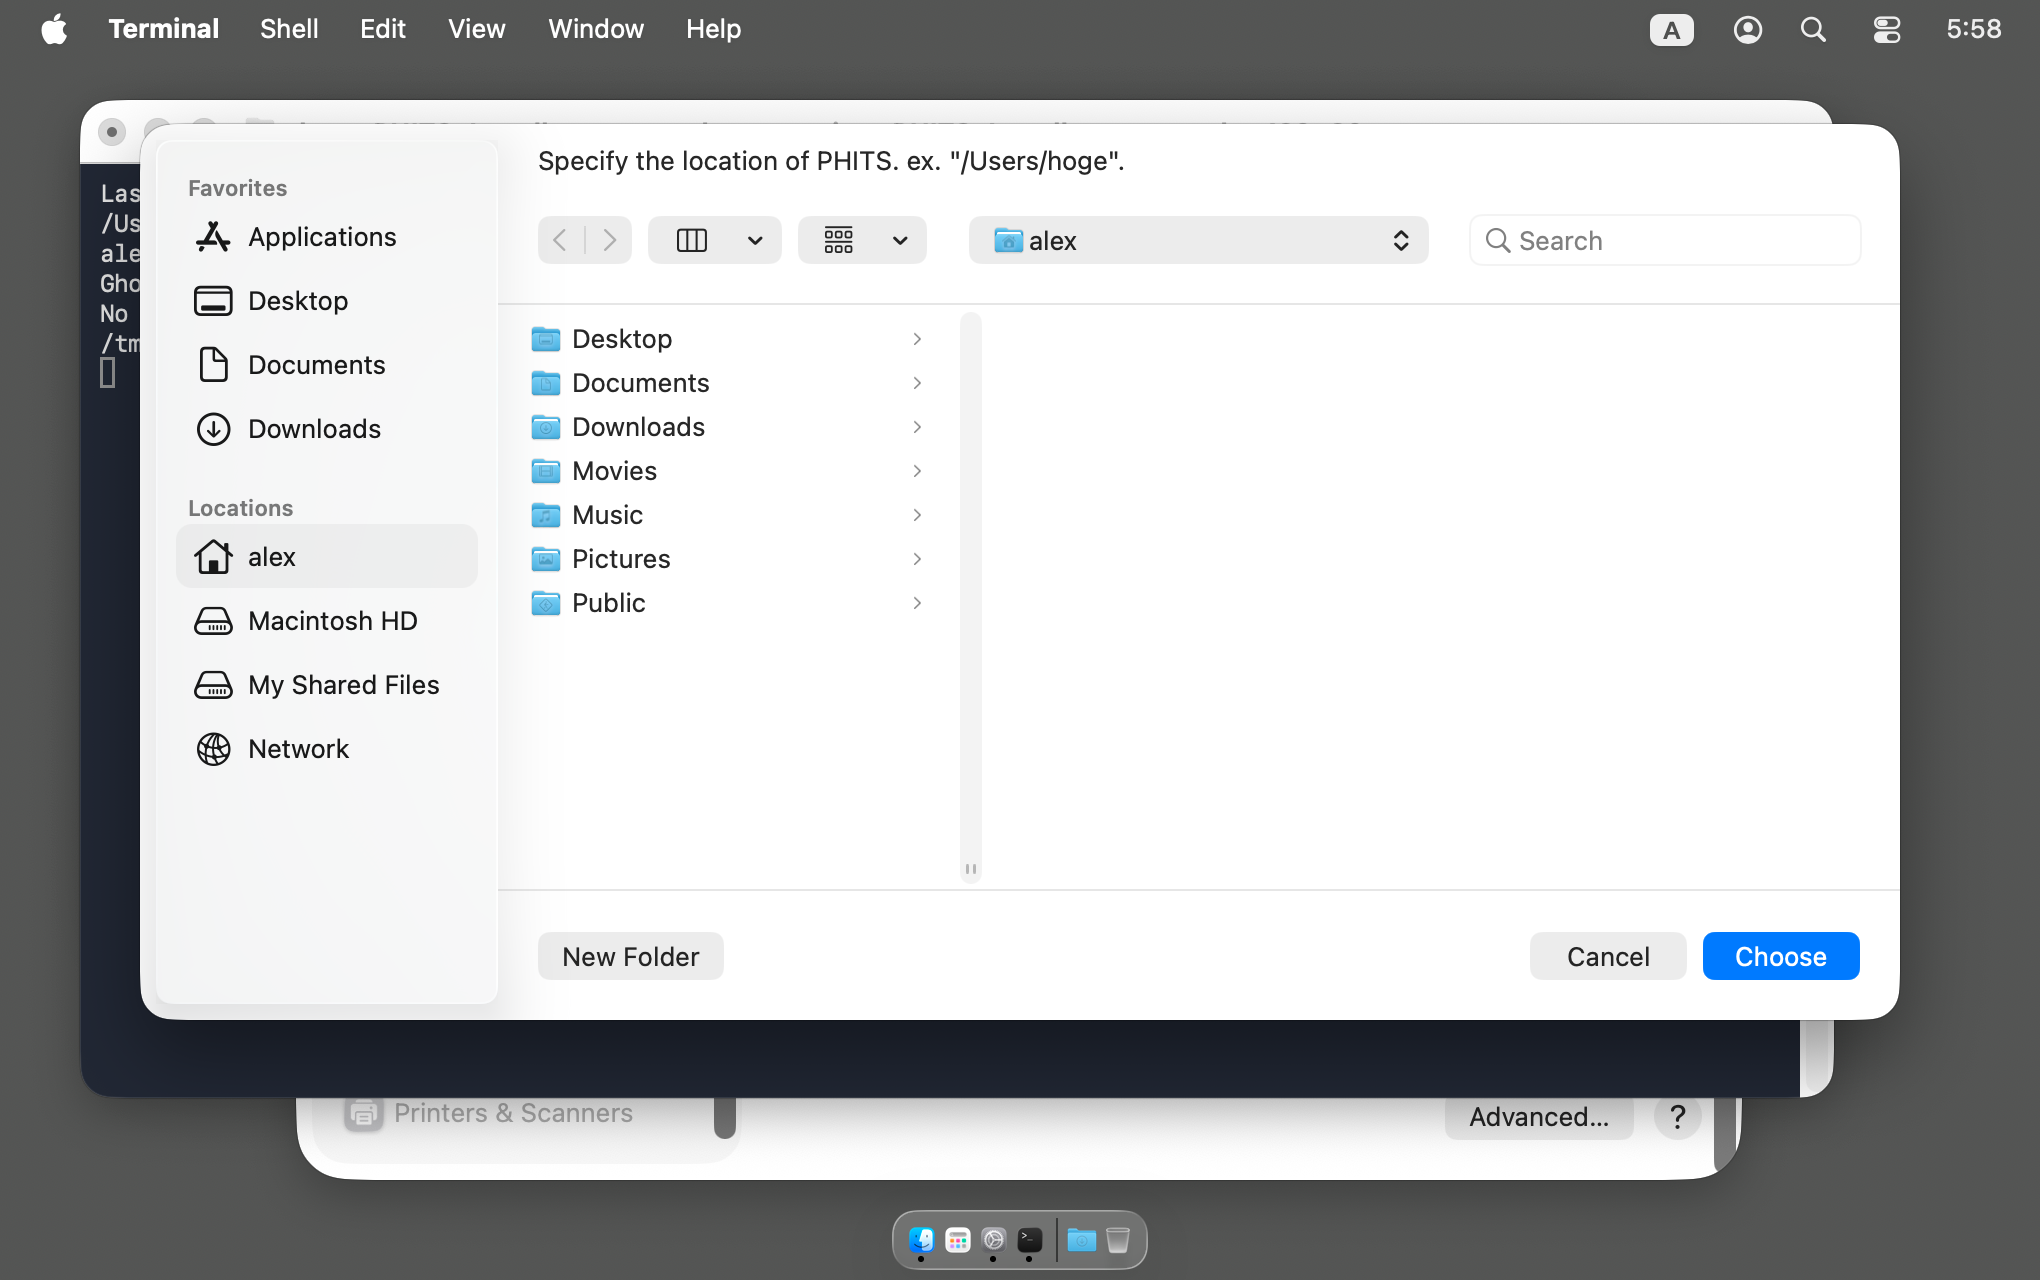
Fig. 2.2.8 Select the installation folder.
After the installation is complete, reboot the system.
A folder named
phitswill be created in the installation destination. It contains PHITS main body, source code, seminar materials, examples, etc.
Tip
If you move the
phitsfolder to another folder after installation, PHITS will no longer work. Please install it again.If a folder named
phitsexists in the installation destination, the old folder will be renamed to phits[today’s date].[current time].If the name of the folder where you copy the PHITS package or the name of the installation folder contains spaces or Chinese characters, an error may occur. Please install the package in a folder that does not contain such characters.
2.2.2.2. What to do if the recommended method fails
Create a
phitsfolder in your home directory (/Users/alexif your account name is alex ).Extract the zip file downloaded from the office and copy
phits.7zin the phitsXXXA folder into thephitsfolder.Double-click the copied
phits.7zto extract it.Double-click
PHITS.Router.app.zip`in thephitsXXX/macfolder to unzip it. Move the resultingPHITS.Router.appto the/Applicationsfolder.Right-click PHITS_Installer.command in the
PHITSXXX/macfolder and select “Open” from the shortcut menu.When choosing the installation mode, select Manual.
Select
phits252_mac.exein thephits/binfolder and start the installation.
If you are unable to install PHITS this way, please see Section 2.2.2.3 .
2.2.2.3. If none of the above methods work
Make PHITS executable from the terminal. If you are running PHITS from the terminal for the first time, you need to add the path to the folder that contains the PHITS executable file. To add the path, enter the following command in the terminal:
$ echo 'export PHITSPATH=/PATH-TO-PHITS/phits' >> .zshenv
$ echo 'export PATH=$PHITSPATH/bin:$PHITSPATH/dchain-sp/bin:$PATH' >> .zshenv
$ source .zshenv
Here, change “/PATH-TO-PHITS” to the name of the installation folder (for example, /Users/alex if your account name is alex ). If you do not know what PATH-TO-PHITS is, enter the following when you start the terminal.
$ find $HOME -name phits_mac
The result of this command, with /phits/bin removed, corresponds to PATH-TO-PHITS. Note that this PATH setting is only required the first time you run PHITS; it is not necessary thereafter.
Next, grant execution permission to the executable file. Run the following command in the terminal.
$ chmod 755 $PHITSPATH/bin/* $PHITSPATH/dchain-sp/bin/*
$ chmod 755 $PHITSPATH/utility/phig3d/macos-universal/phig3d.app/Contents/MacOS/phig3d
$ chmod 755 $PHITSPATH/workbench/phitspad/macos/PhitsPad.app/Contents/MacOS/phitspad
$ xattr -d -r com.apple.quarantine $PHITSPATH/bin/* $PHITSPATH/dchain-sp/bin/*
$ xattr -d -r com.apple.quarantine $PHITSPATH/utility/phig3d/macos-universal/phig3d.app/Contents/MacOS/phig3d
$ xattr -d -r com.apple.quarantine $PHITSPATH/workbench/phitspad/macos/PhitsPad.app/Contents/MacOS/phitspad
2.2.3. Execution
Once the installation of PHITS is complete, the PHITS Router` icon will be added to the dock.
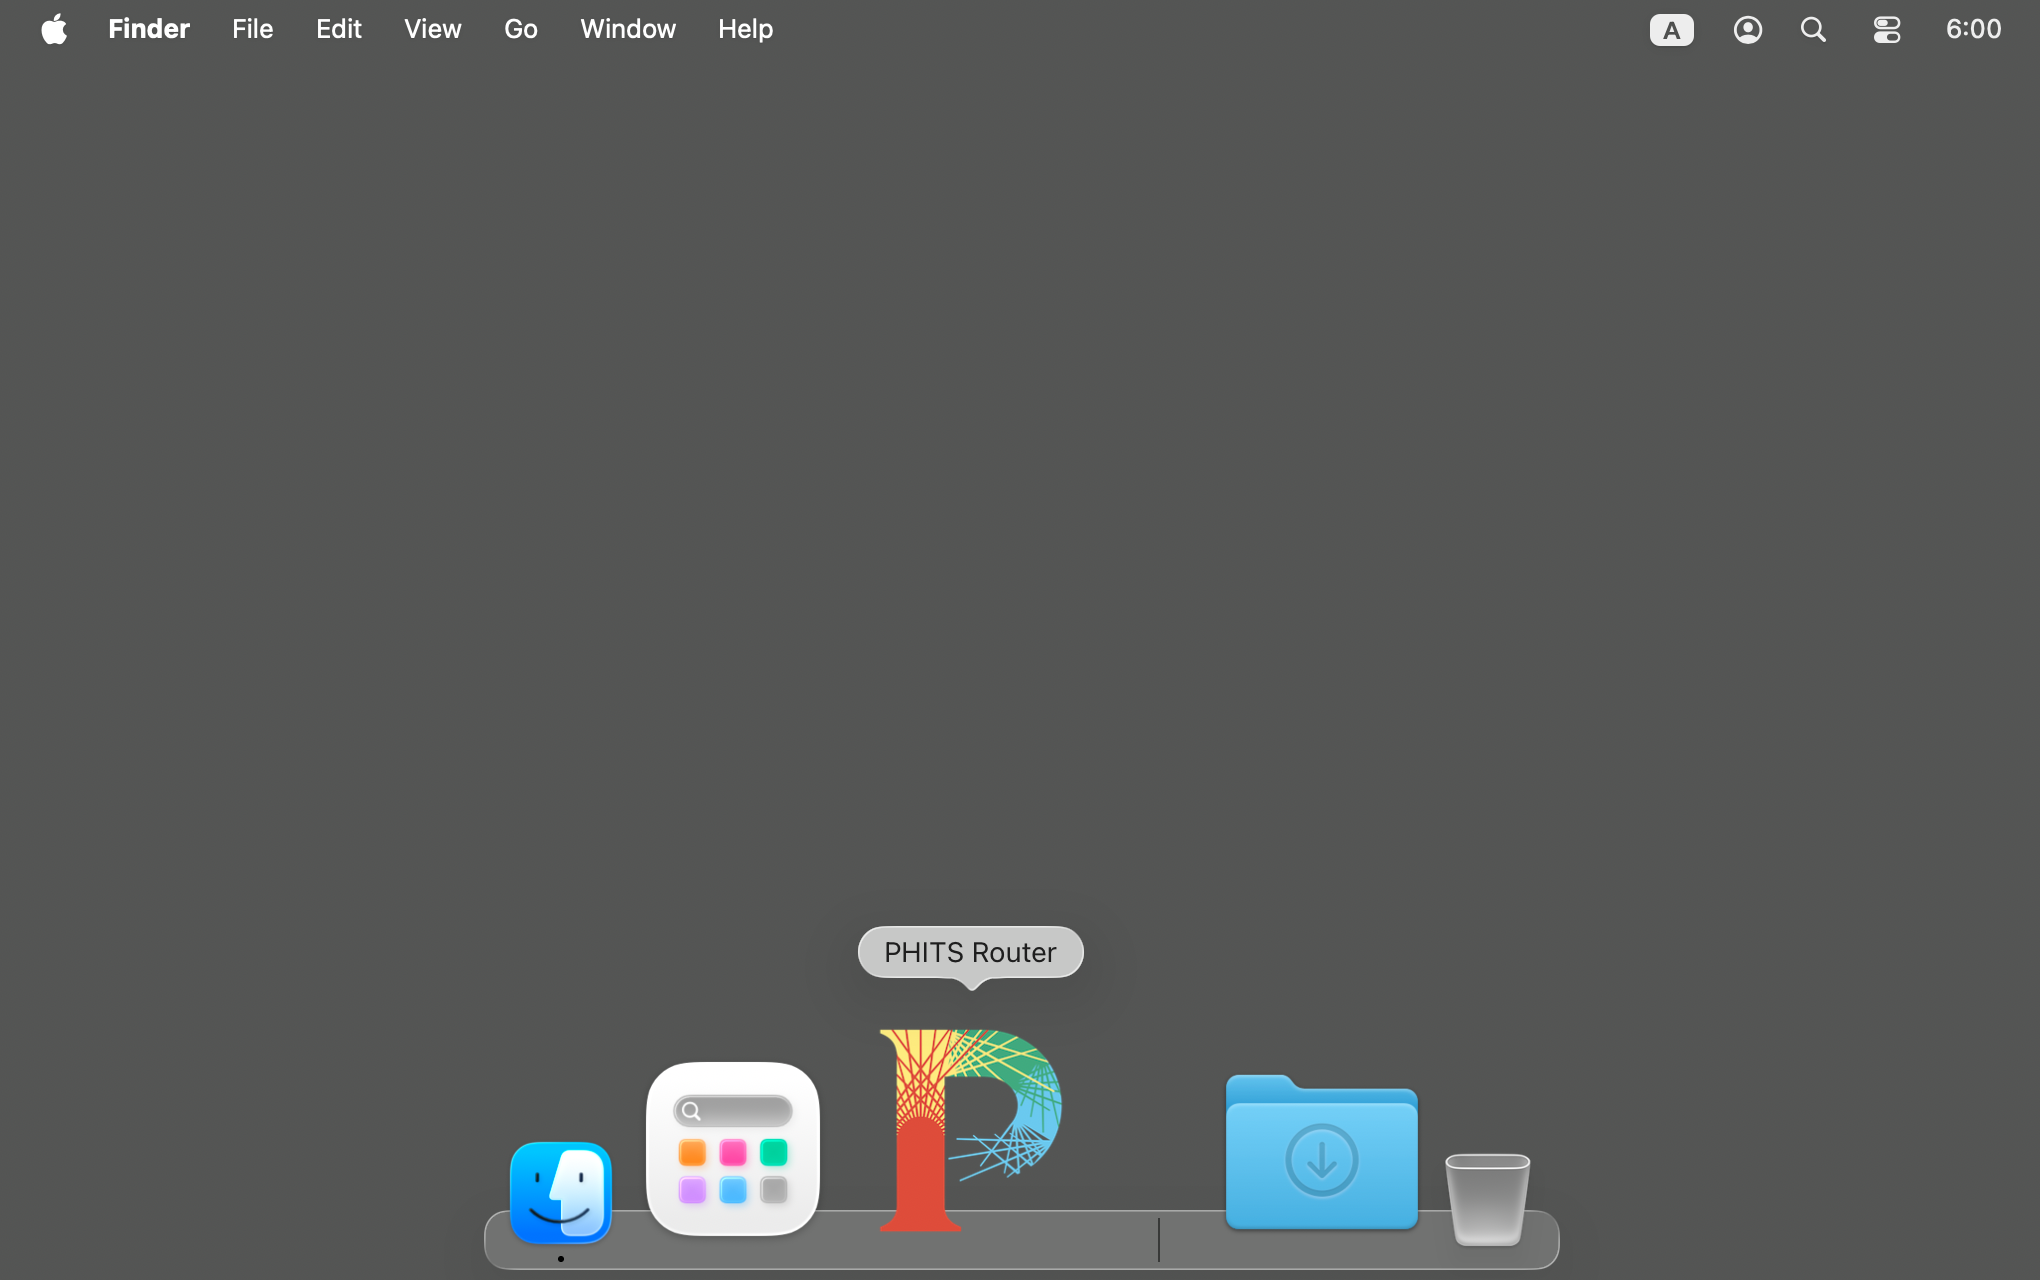
Fig. 2.2.9 The icon for PHITS Router has been added to the dock.
2.2.3.1. File Associations
Right-click the PHITS input file phits/lecture/basic/lec01/lec01.inp, select Open with, and
then select Other .
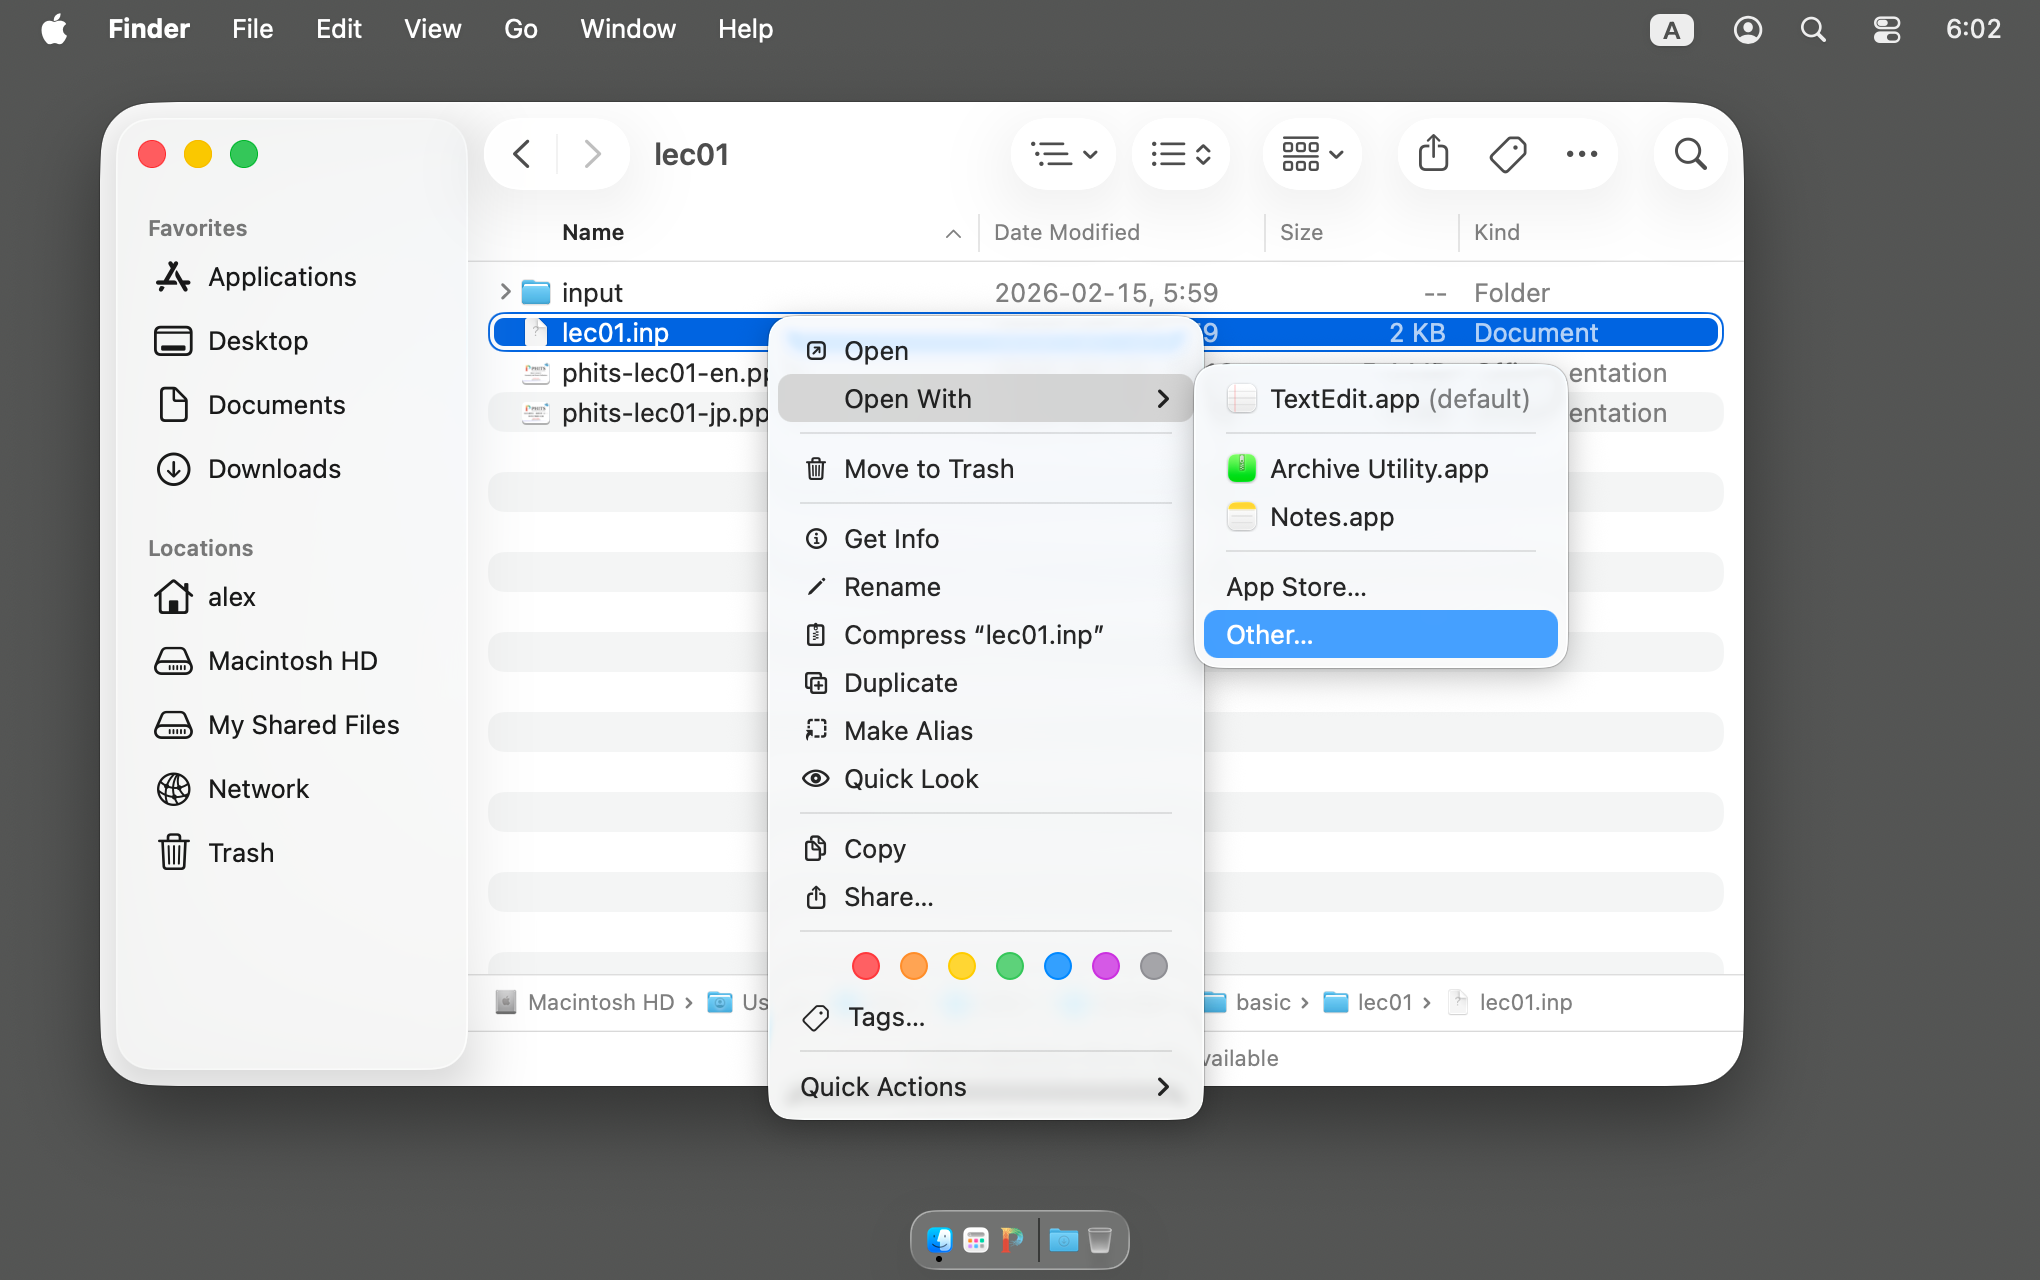
Fig. 2.2.10 Input file association
In the file selection dialog, select PHITS Router and click “Open”.
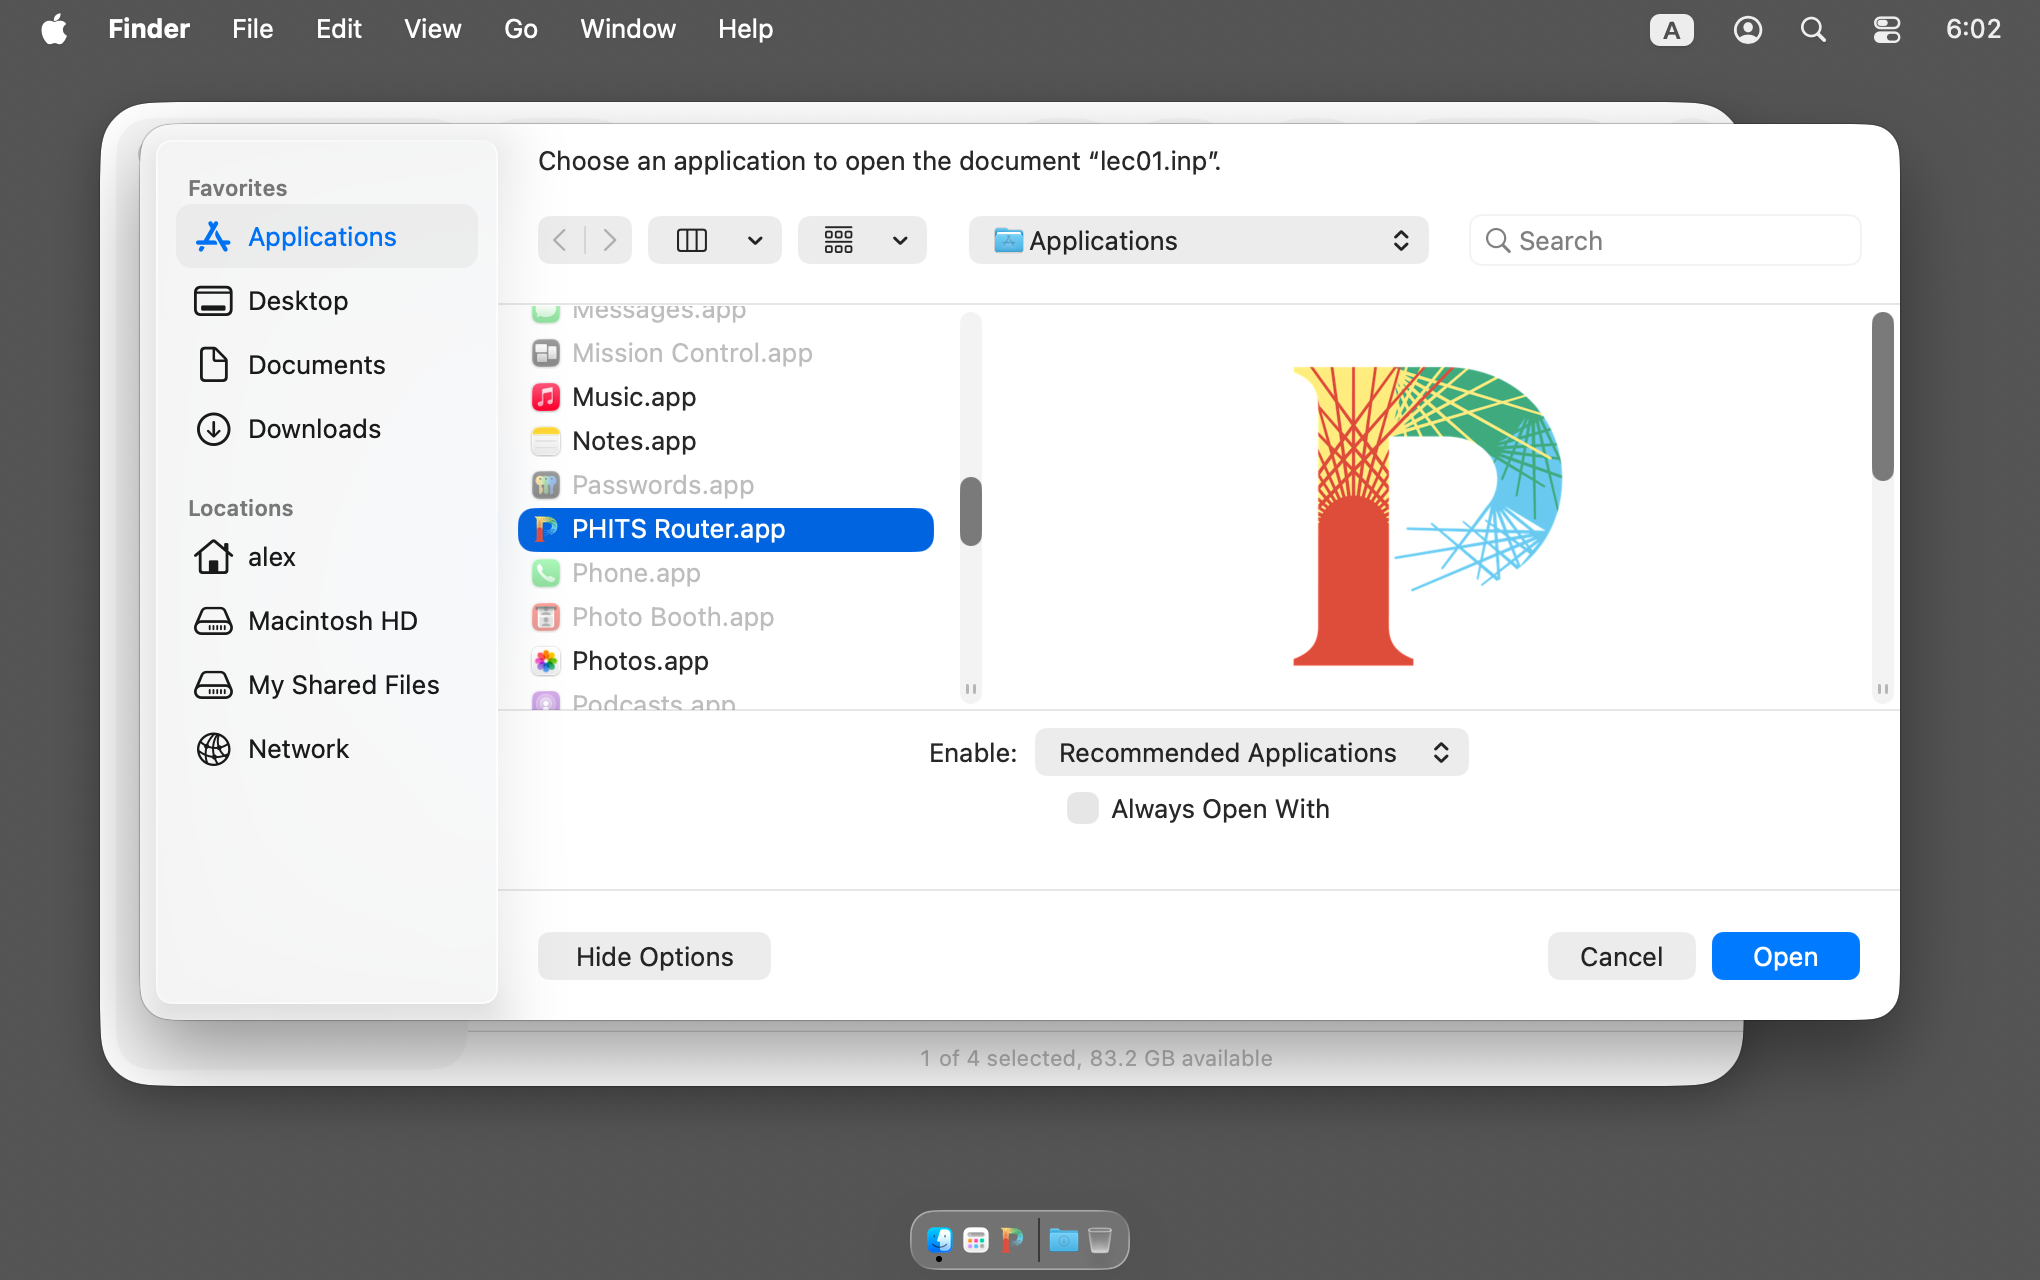
Fig. 2.2.11 Input file association
2.2.3.2. Execution of PHITS
Drag and drop execution
Drag and drop a PHITS input file such as lec01.inp onto the PHITS Router in the dock.
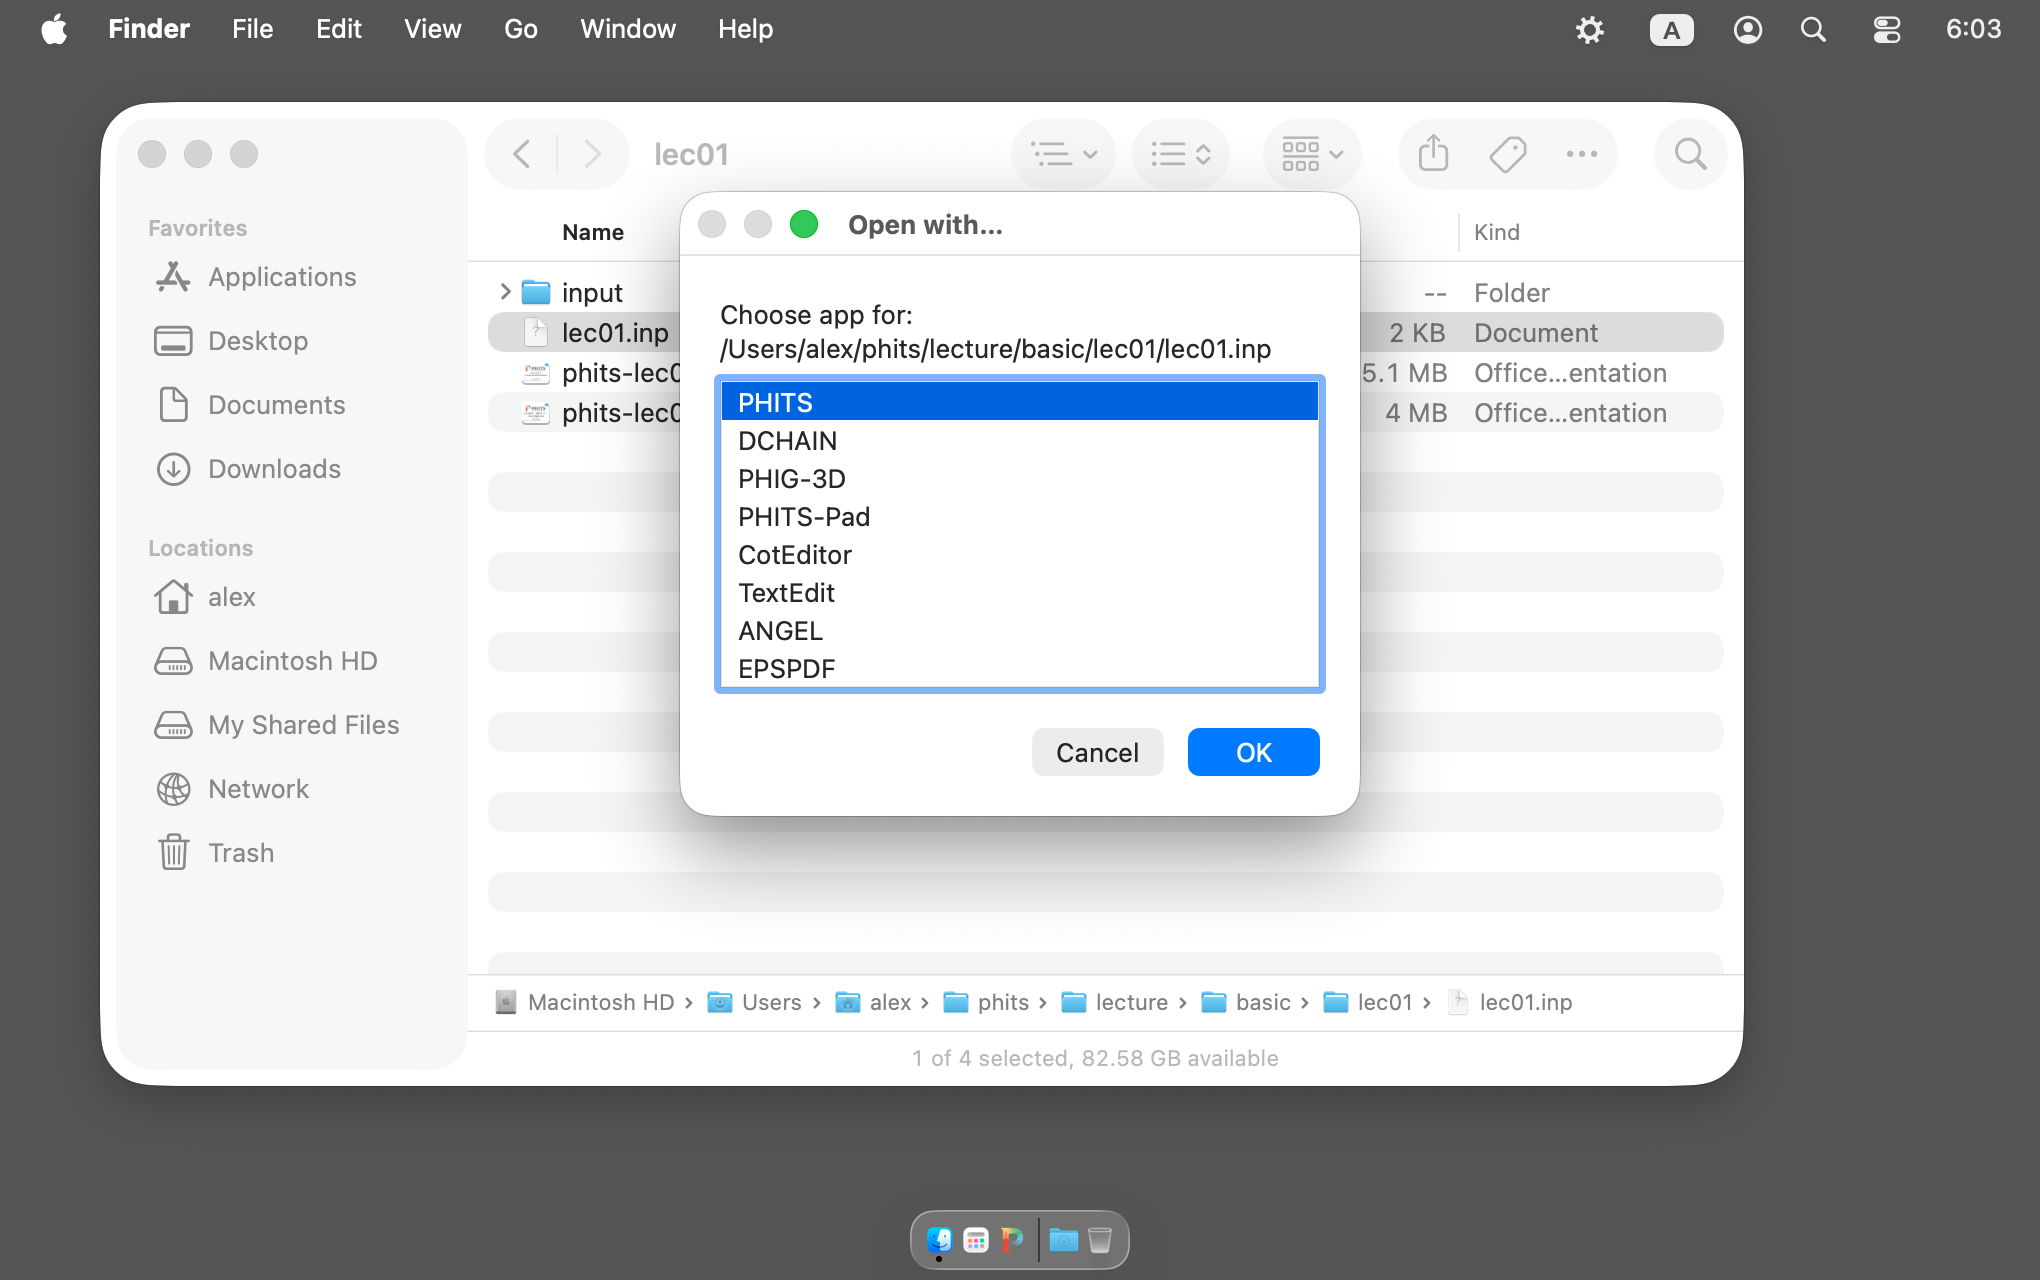
Fig. 2.2.12 Selecting a PHITS
When you start the app for the first time, you will be asked for permission to allow PHITS Router to control Terminal.app. Please allow it.
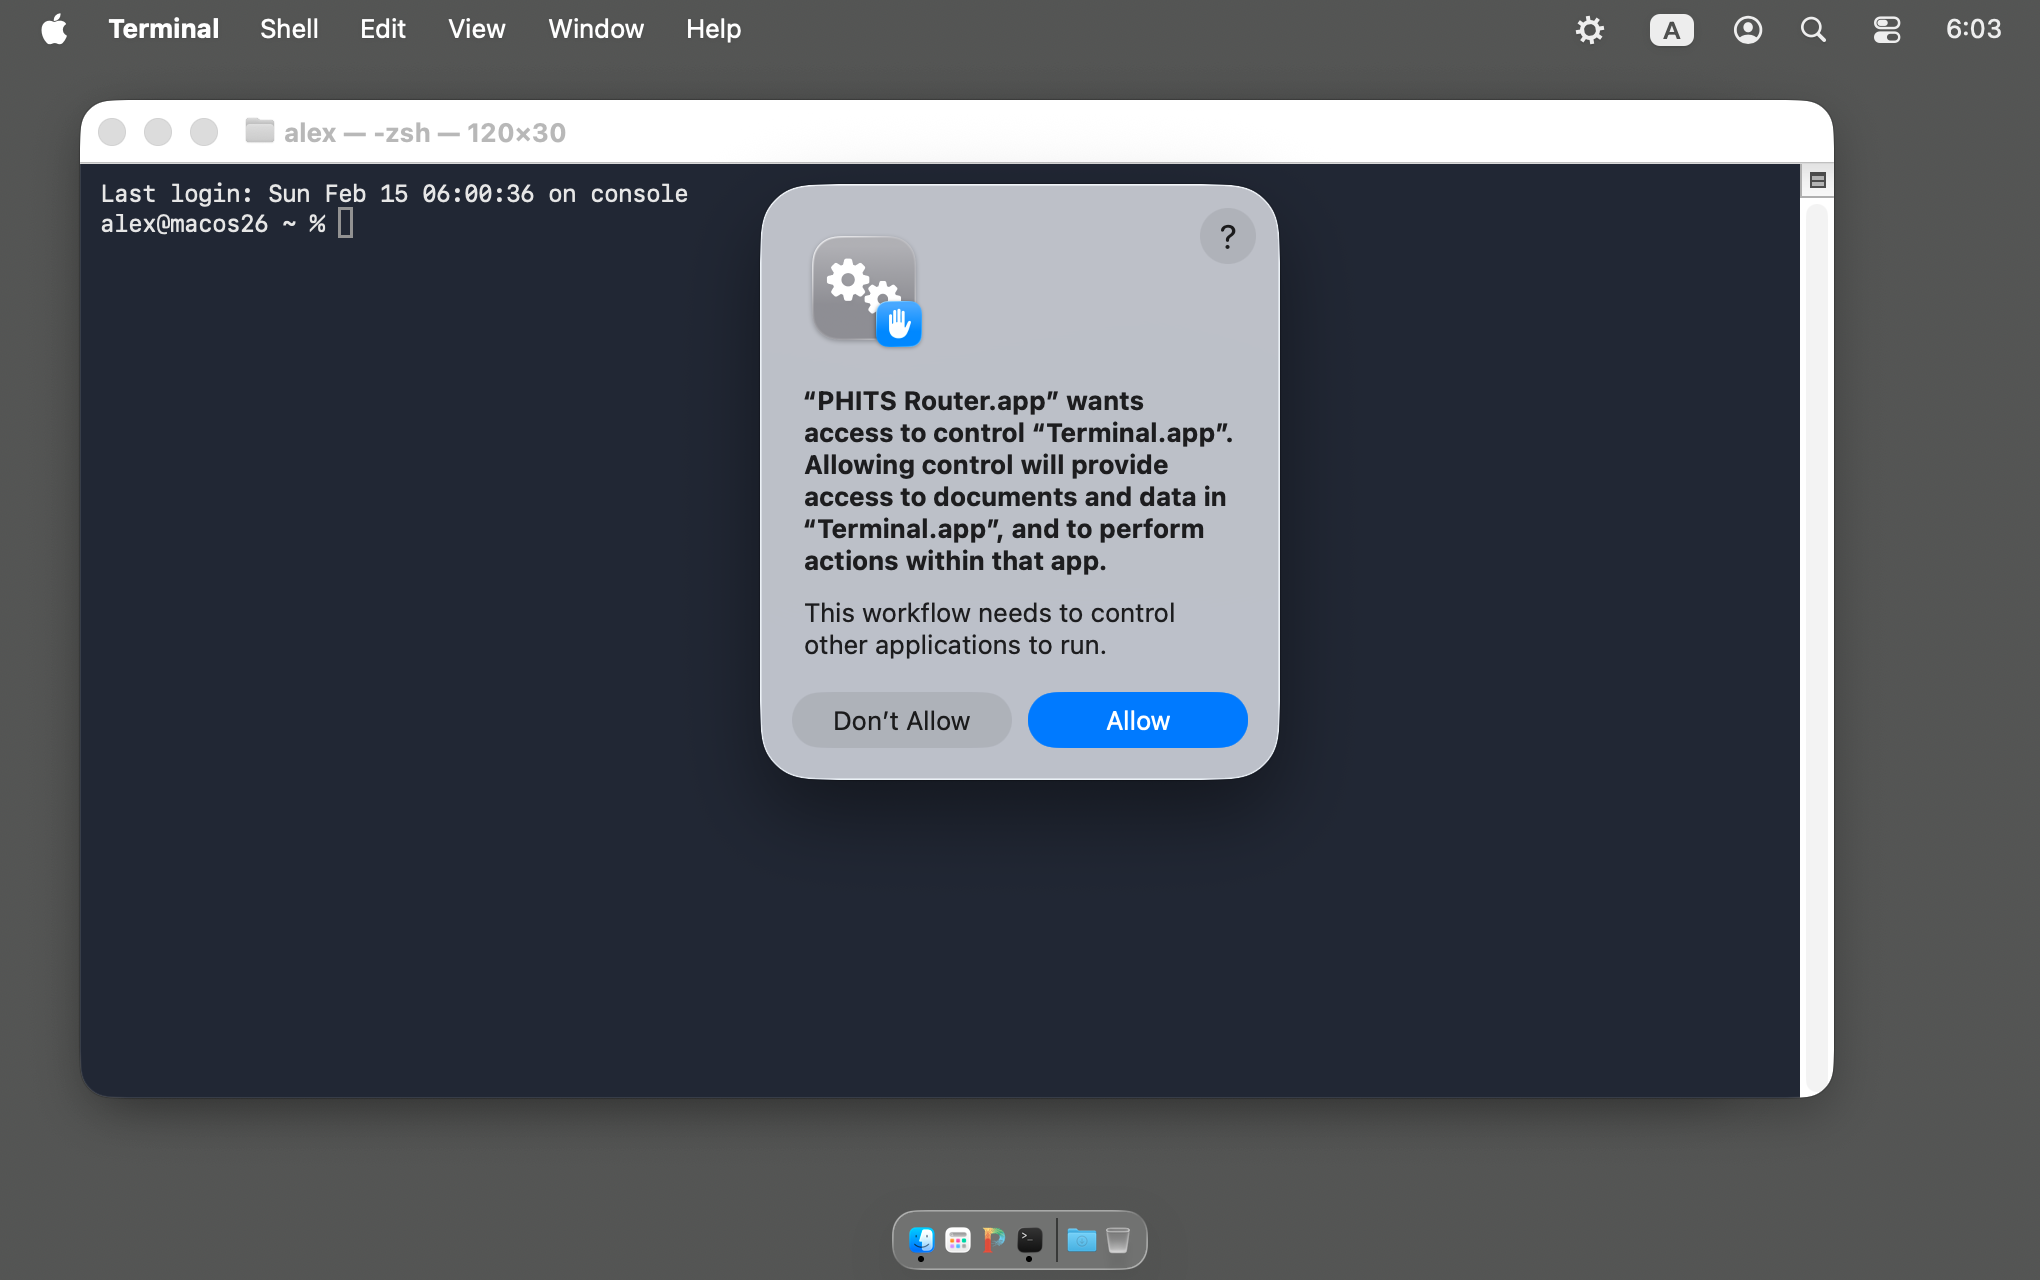
Fig. 2.2.13 dialog requesting permission to control Terminal.app
This screen will appear, so select PHITS and click OK.
If you drag and drop the input file into PHITS Router while holding down the ⌘ Command key, PHITS will be executed directly without displaying this screen.
A new terminal will open and display the calculation status. The calculation output file will be created in the same folder as the input file.
If you want to run the calculation again with the same input, press the ↑ up arrow key in the terminal where the calculation status is displayed, then press the return key.
Running in Terminal
In the terminal, go to the directory where the input file is located and run the following command:
$ phits.sh <input file name>
example
$ phits.sh lec01.inp
2.2.3.3. Execution of PHITSPAD
Drag and drop execution
Drag and drop a PHITS input file such as lec01.inp onto PHITS Router in the dock.
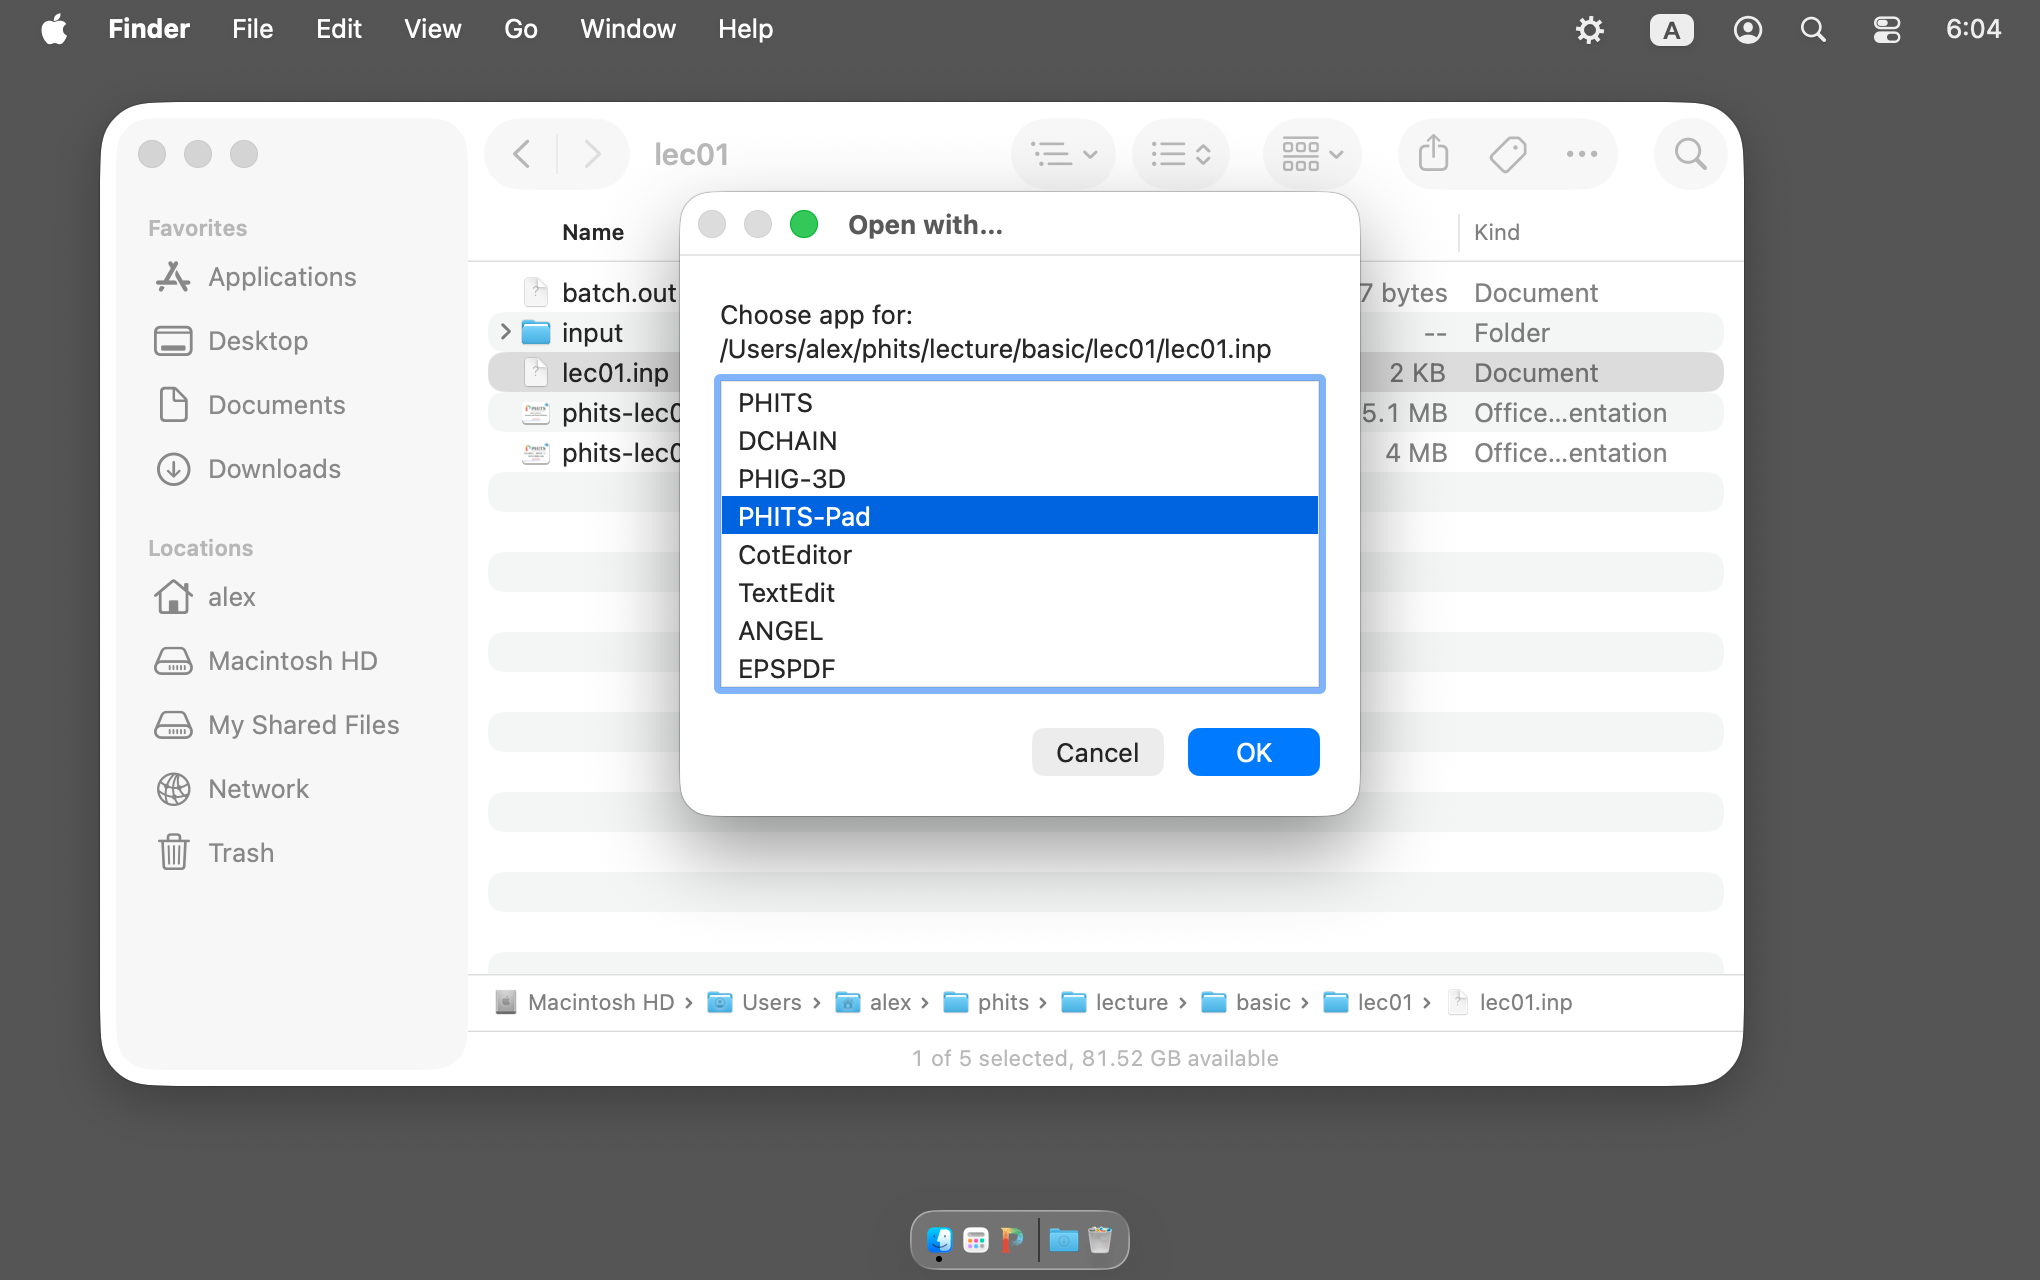
Fig. 2.2.14 Selecting a PHITSPAD
This screen will appear, so select PHITS-Pad and press OK.
If you drag and drop the input file into PHITS Router while holding down the ⇧ Shift key, PHITS-Pad will launch directly without displaying this screen.
Running in Terminal
In the terminal, go to the directory where the input file is located and run the following command:
$ phitspad.sh <input file name>
example
$ phitpad.sh lec01.inp
2.2.3.4. Execution of PHIG-3D
Drag and drop execution
Drag and drop a PHITS input file such as lec01.inp onto PHITS Router in the dock.
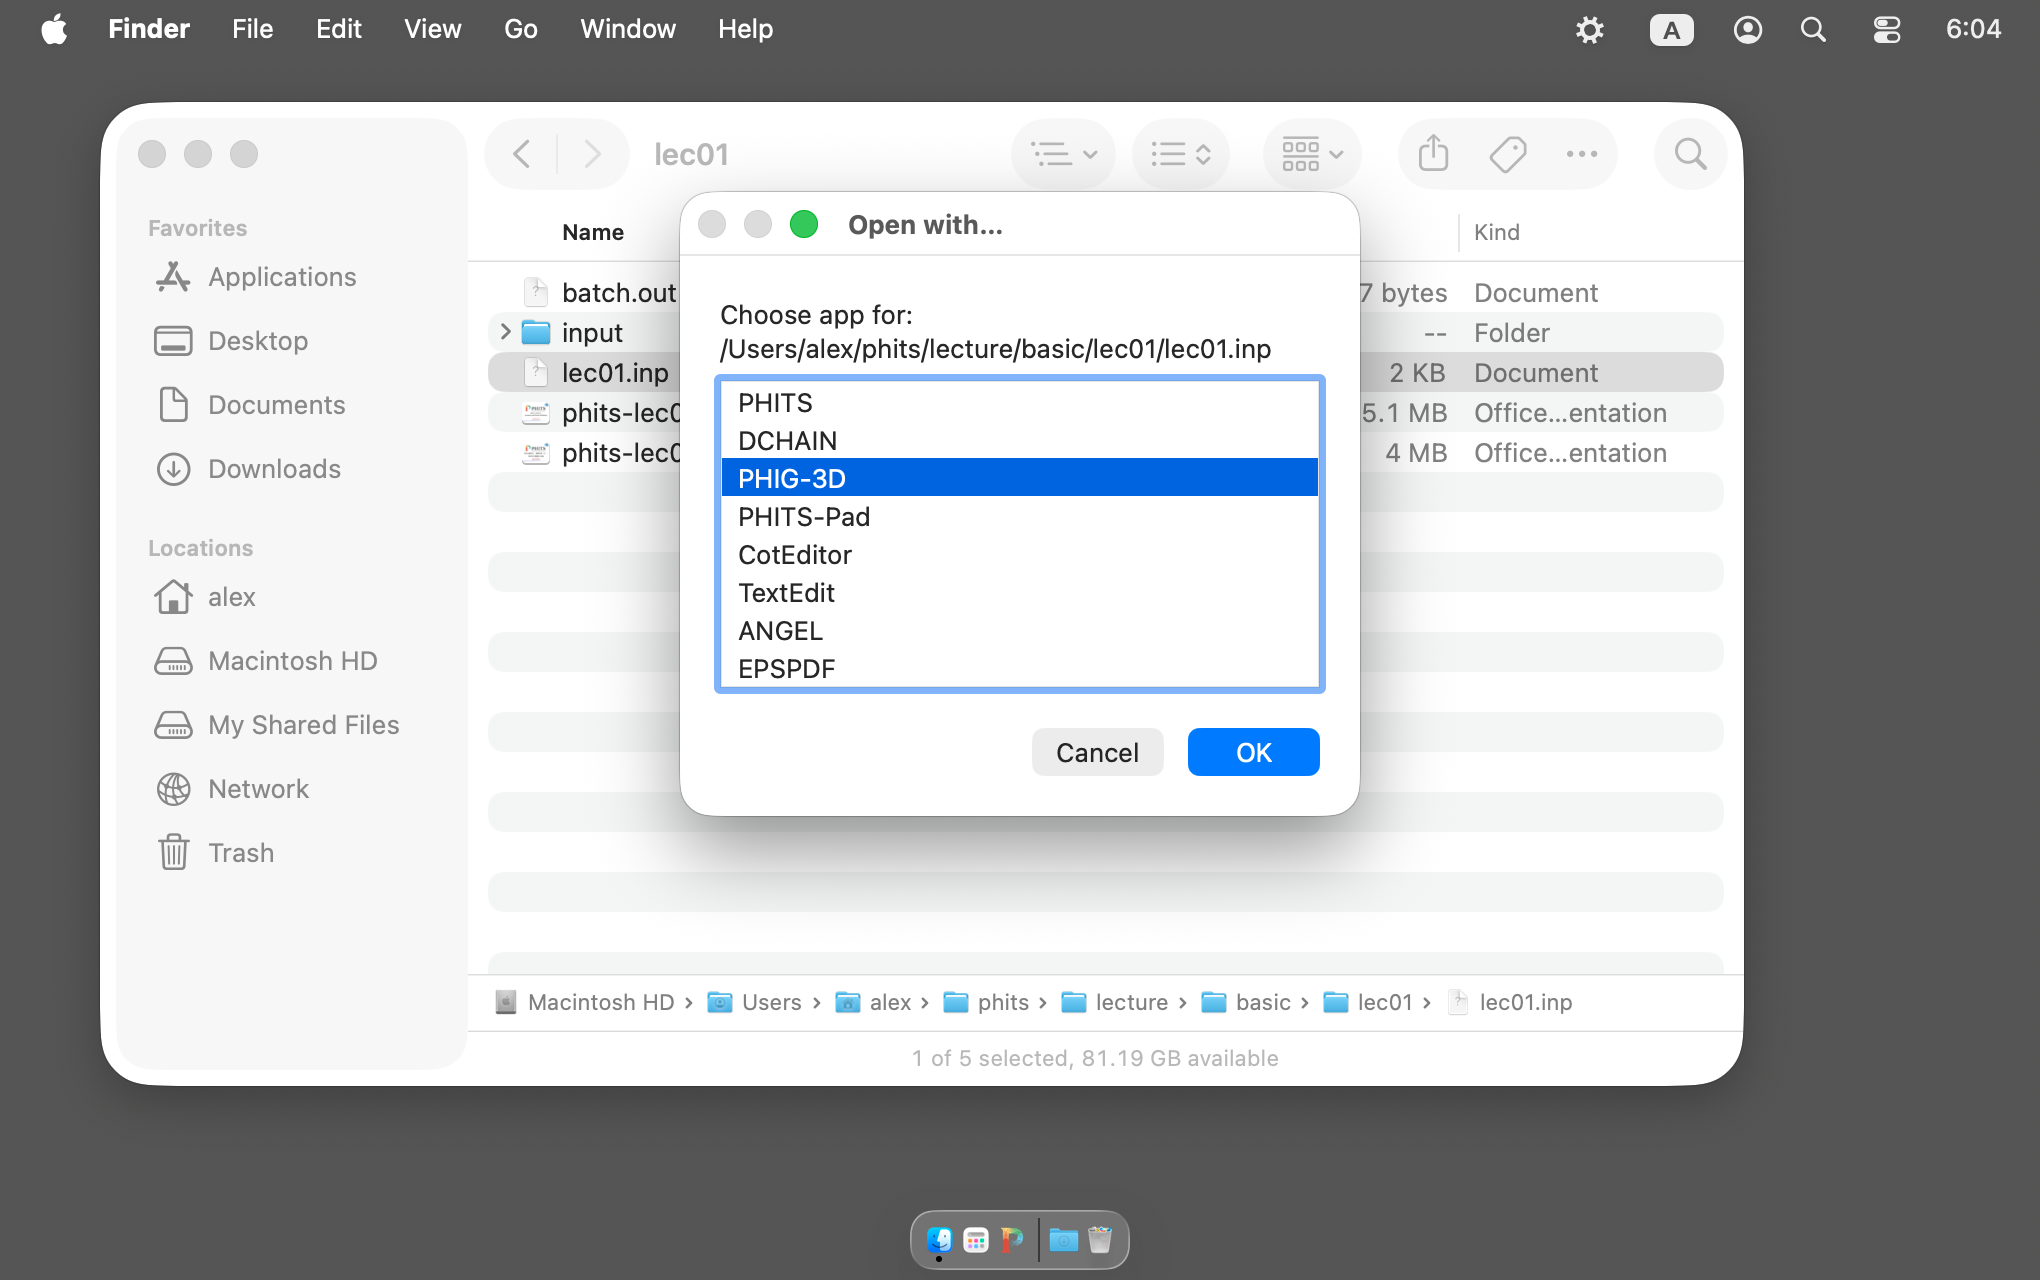
Fig. 2.2.15 Selecting a PHIG3D
This screen will appear, so select PHIG-3D and click OK.
If you hold down the ⌥ Option key and drag and drop the input file into PHITS Router, PHIG-3D will launch directly without displaying this screen.
Running in Terminal
In the terminal, go to the directory where the input file is located and run the following command:
$ phig3d.sh <input file name>
example
$ phig3d.sh lec01.inp
2.2.3.5. Execution of ANGEL
Drag and drop execution
Drag and drop the output file generated by PHITS, such as track_xz.out, onto PHITS Router in the dock.
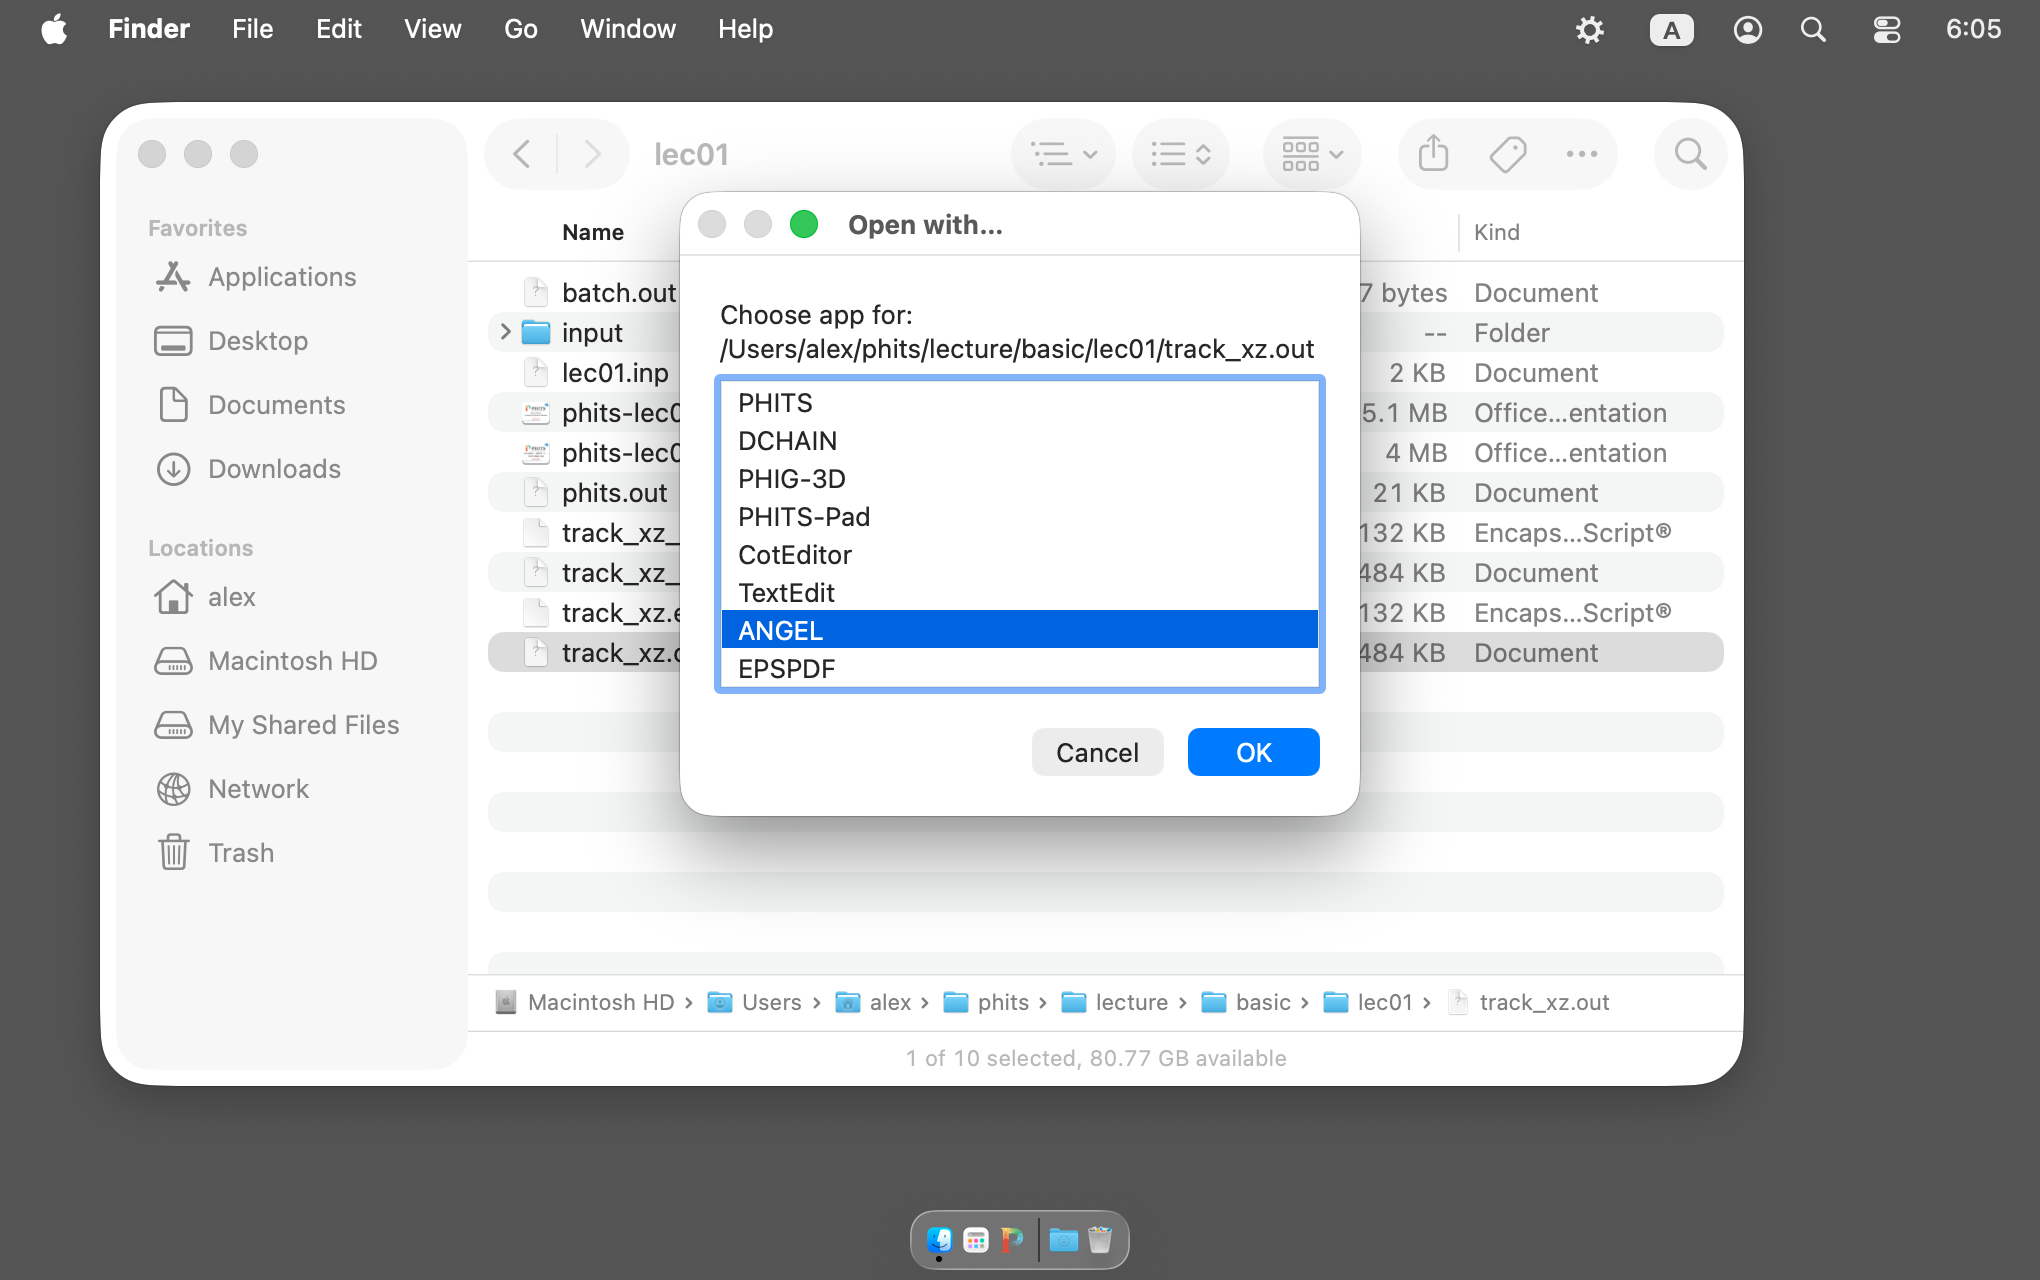
Fig. 2.2.16 Selecting an ANGEL
This screen will appear, so select ANGEL and click OK.
If you hold down the ⌥ Option key and drag and drop the input file into PHITS Router, ANGEL will launch directly without displaying this screen.
Running in Terminal
In the terminal, go to the directory where the input file is located and run the following command:
$ angel.sh <input file name>
example
$ angel.sh track_xz.out
2.2.3.6. Execution of DCHAIN
Drag and drop execution
Drag and drop the output file generated by PHITS, such as tdchain.out, onto PHITS Router in the dock.
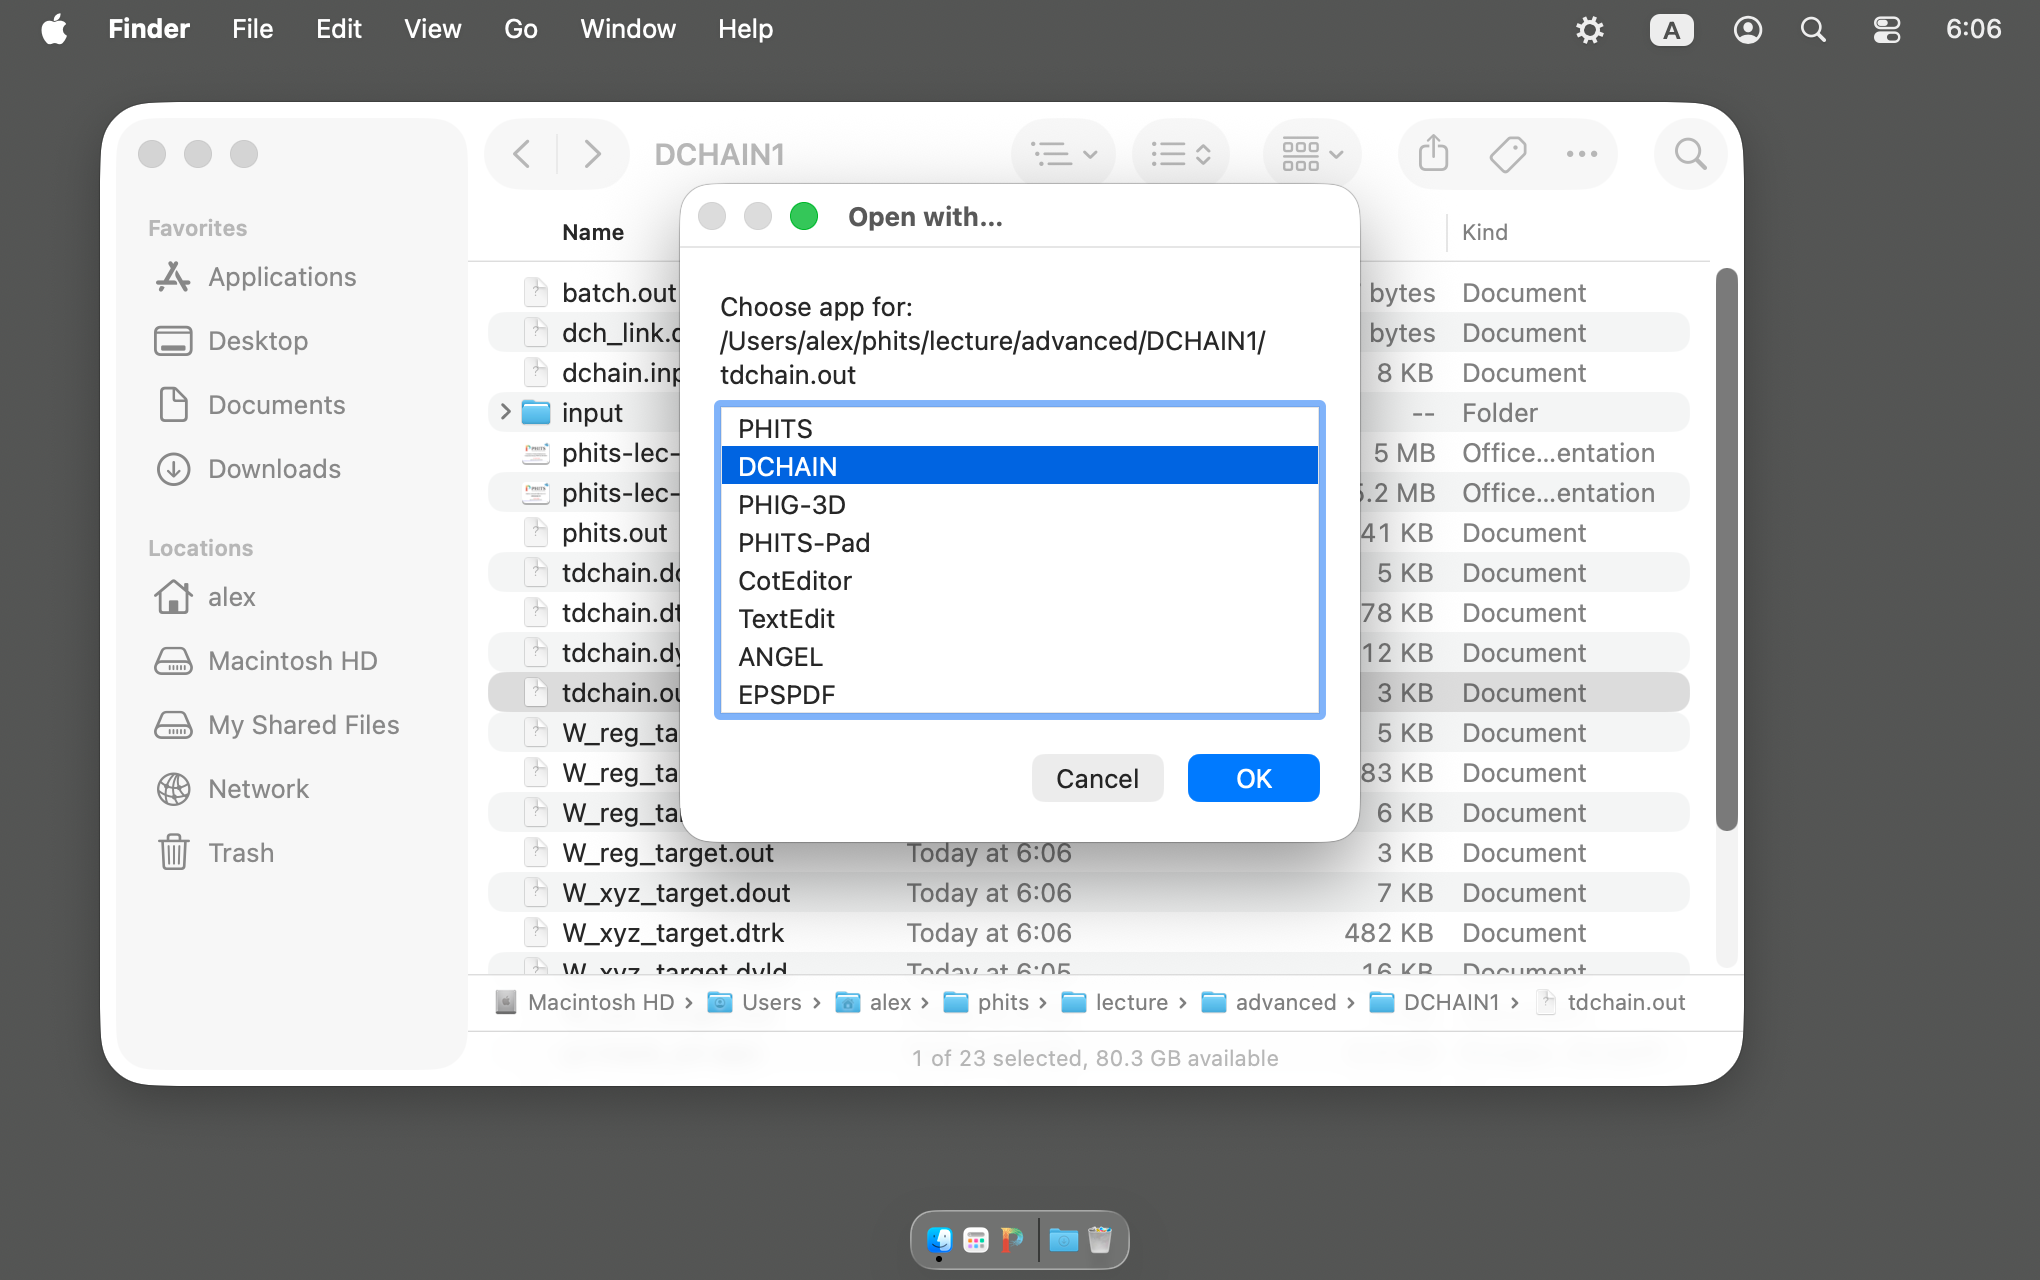
Fig. 2.2.17 Selecting a DCHAIN
This screen will appear, so select DCHAIN and press OK.
If you drag and drop the input file into PHITS Router while holding down the ⌘ Command key, DCHAIN will launch directly without displaying this screen.
Running in Terminal
In the terminal, go to the directory where the input file is located and run the following command:
$ dchain.sh <input file name>
example
$ dchain.sh tdchain.out
2.2.3.7. Detailed instructions for using PHITS Router
PHITS Router allows you to configure your preferred text editor. For details, see https://github.com/Lindt8/phits-router-macos .
2.2.3.8. Viewing EPS files
Recommendation method
Double-click on the EPS file.
If you double-click multiple EPS files at the same time, each file will be converted to PDF and displayed.
If you can’t open it by double-clicking
If the following screen appears when you double-click an EPS file, please follow the steps below.
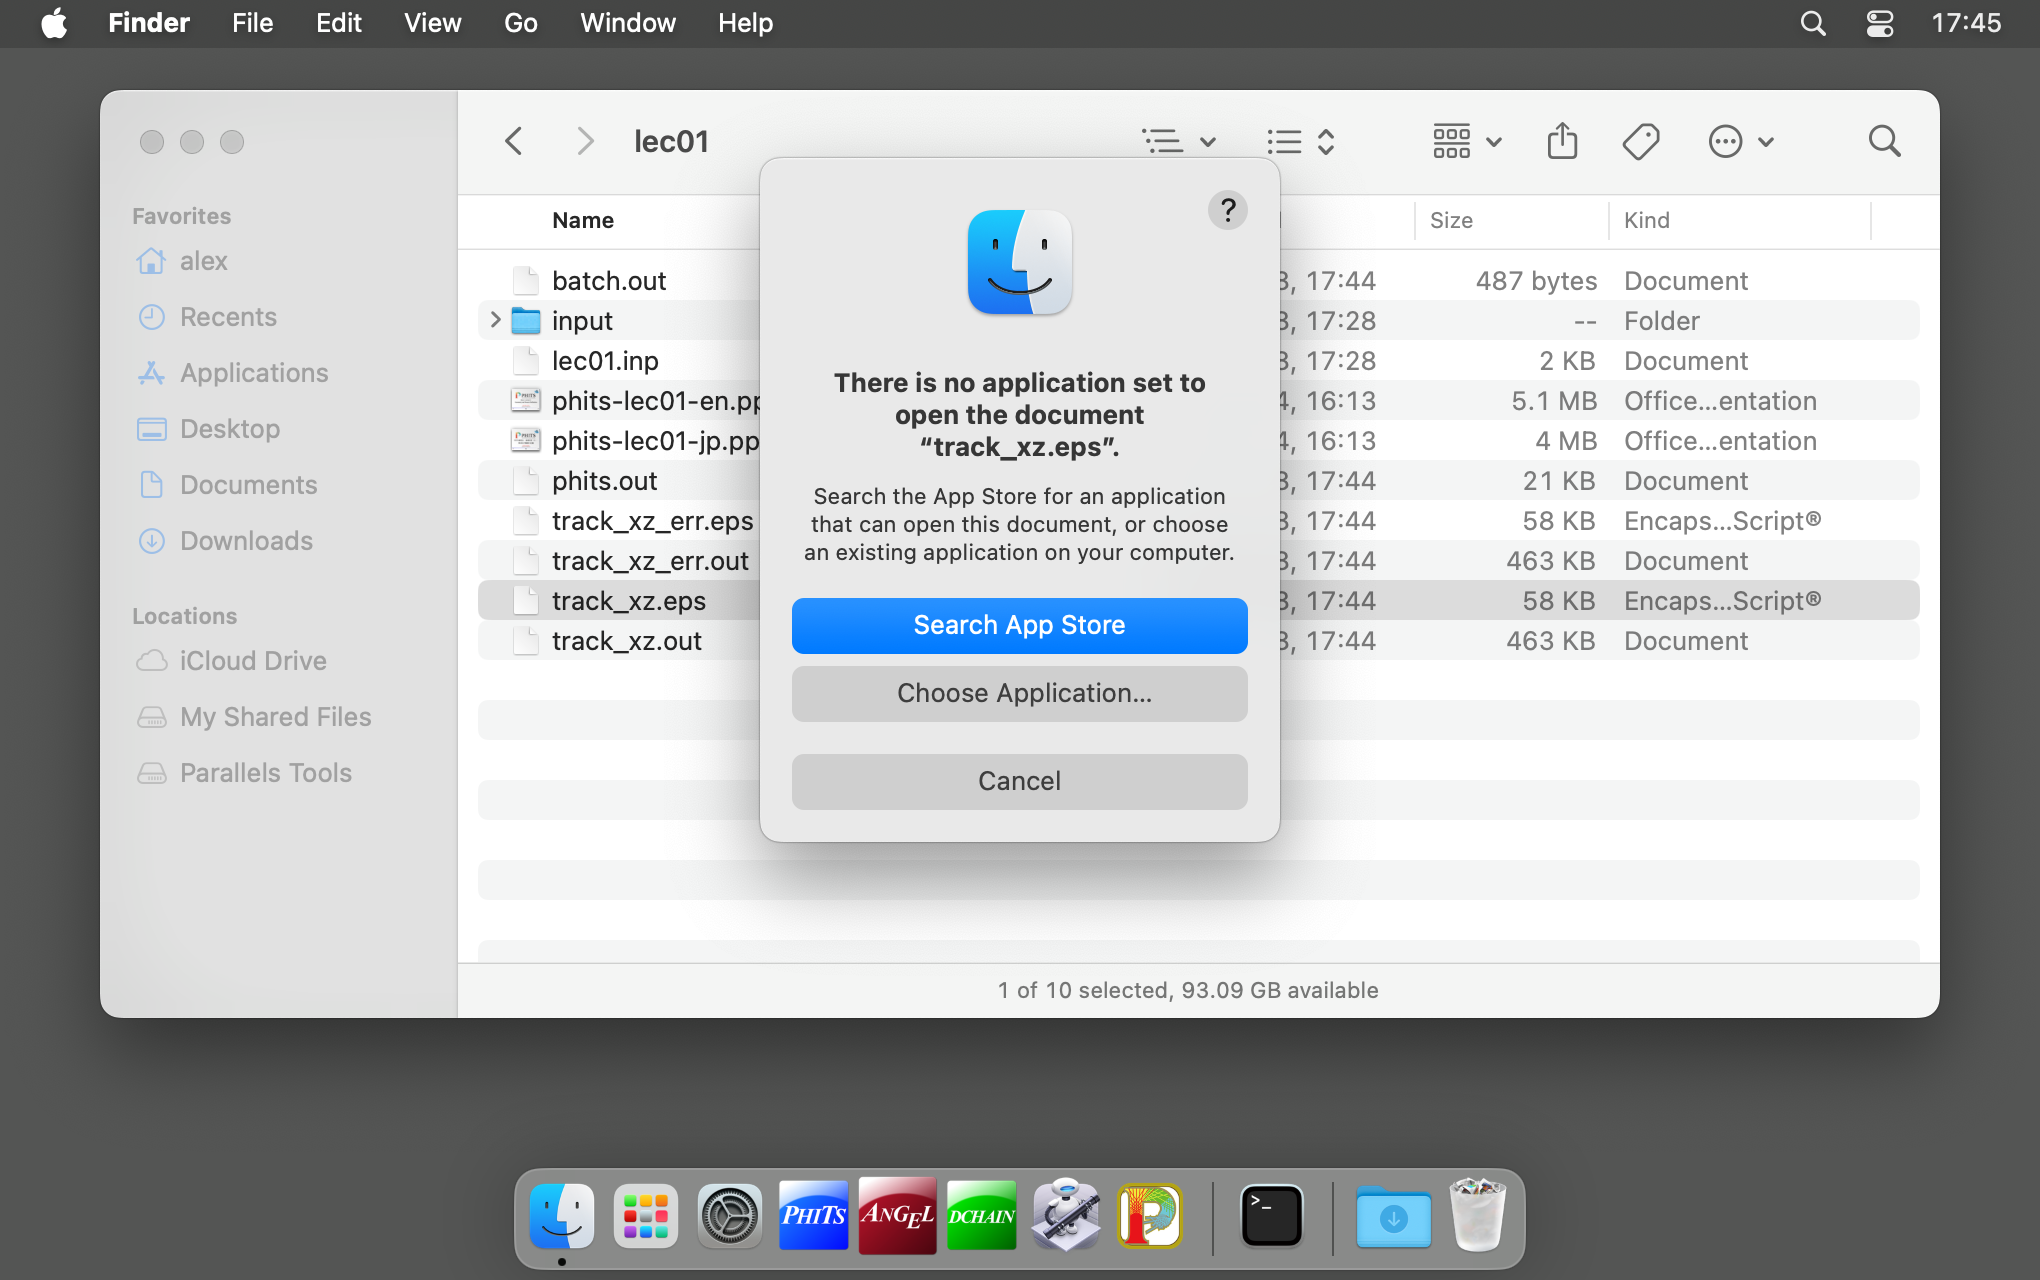
Fig. 2.2.18 A dialog box appears stating that there is no application to open the EPS file
In the screen above, click “Choose Application”. Select phits/bin/EPSPDF.app in the file selection dialog.
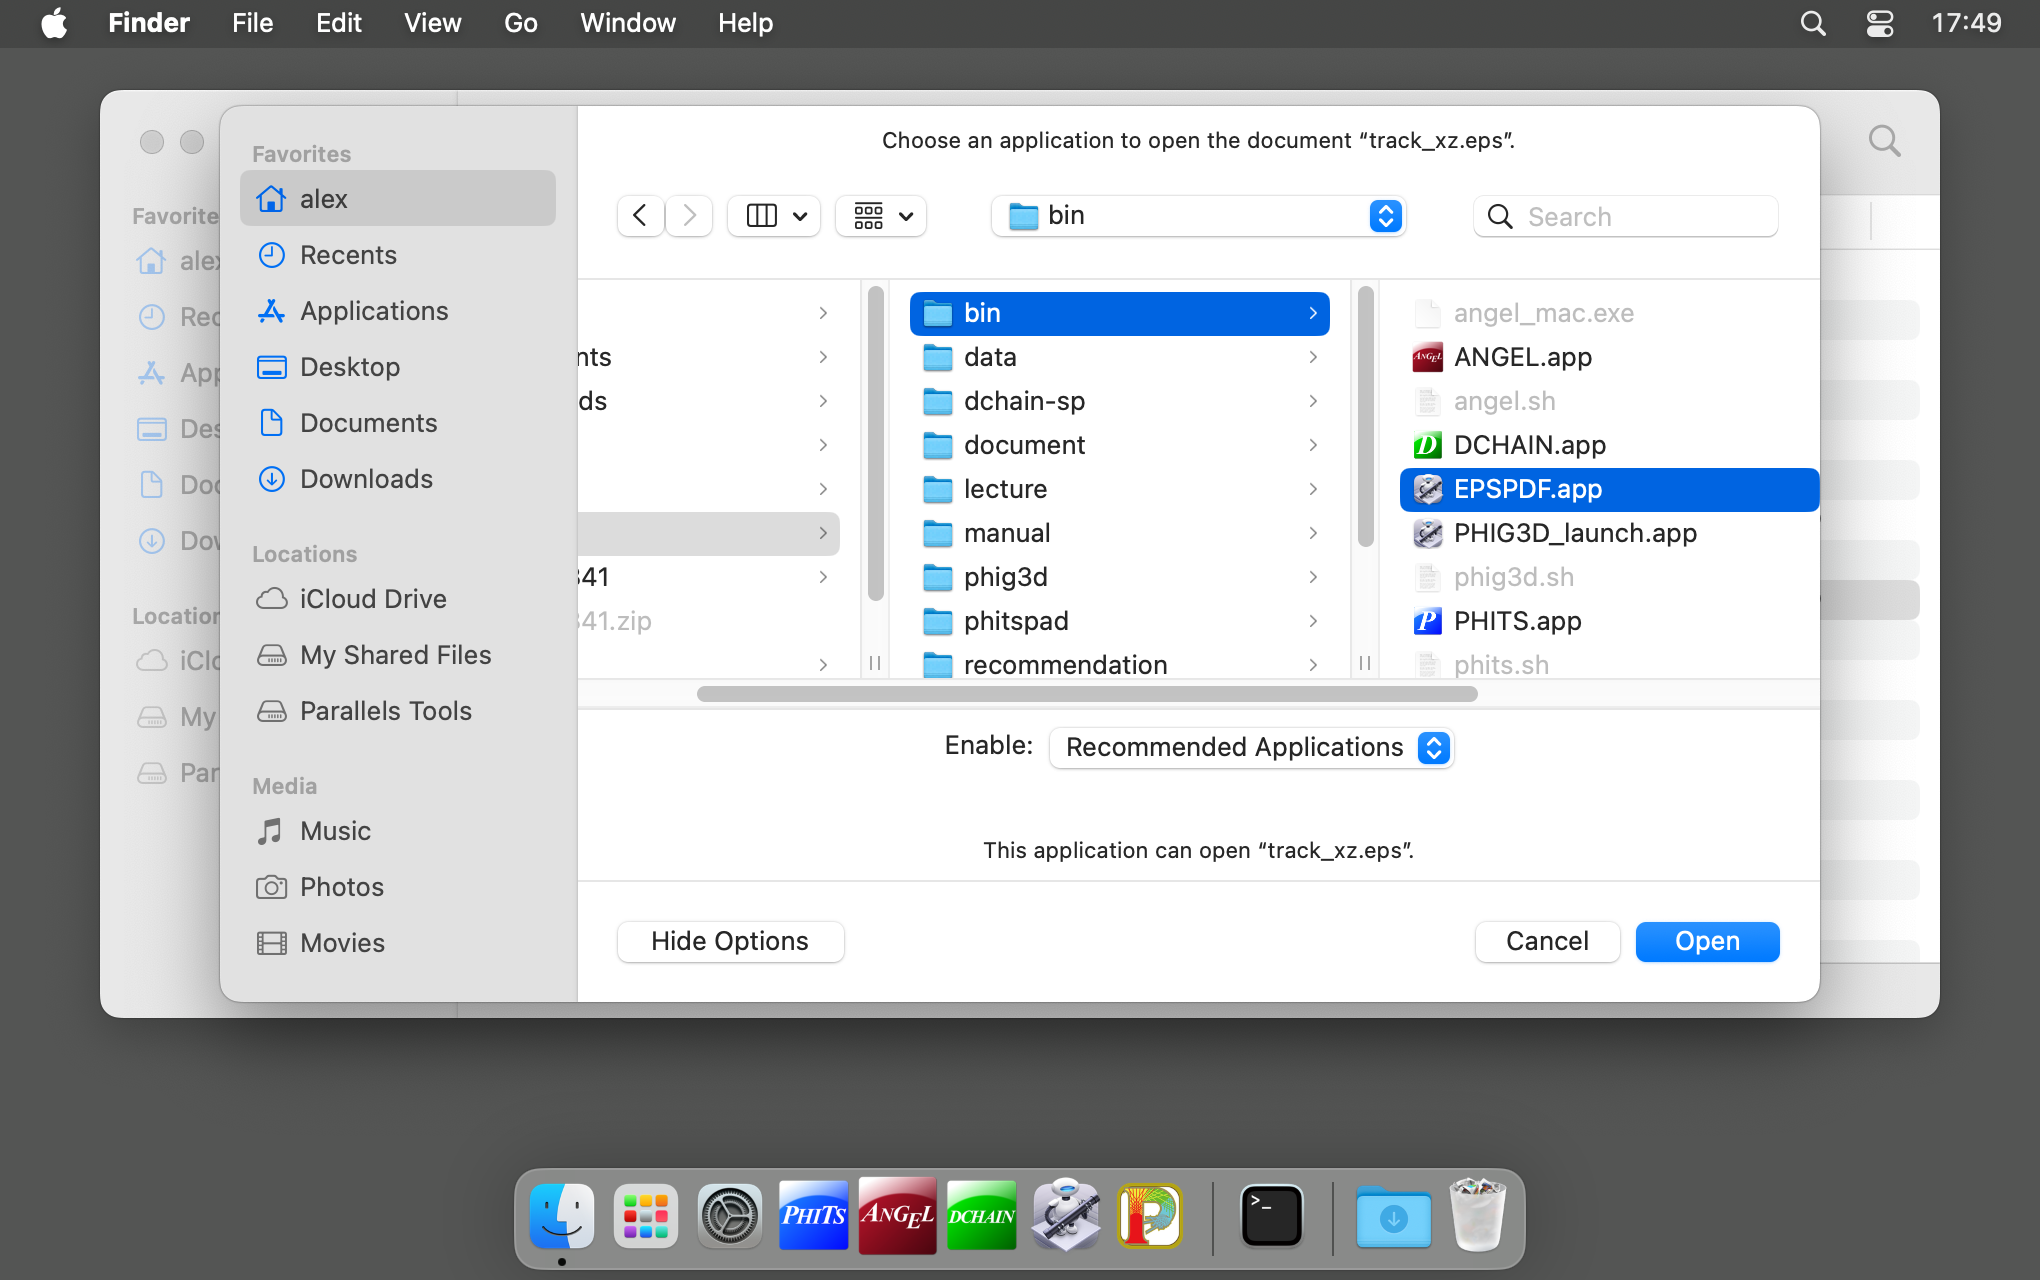
Fig. 2.2.19 Dialog to select EPSPDF.app
Tip
Double-clicking any EPS file, not just EPS files created by PHITS or ANGEL, will open the file in preview via this application.
If you want to open the EPS file in a different application, right-click on it and select “Open with” and choose the application you want to use.